


Center the net on the pitch line, flip the screen cutout to the left so it clears a lefty’s arm path, and hold 45 feet for full-speed work. Anchor it with sandbags or stakes before the first pitch. Keep sessions short and mechanics-focused with a strict pitch count, and the setup itself stops being the thing you have to think about.
TL;DR:
- Proper assembly and positioning of the lefty pitcher net, including size scaling up to 10x10 feet for full-speed work, reduces mis-hits and improves command.
- Flipping the net’s cutout for a left-handed pitcher and offsetting the setup toward first base avoids interference with the arm swing and enhances safety.
- Securing the net with sandbags or ground stakes and accounting for wind gusts prevents tipping, increases safety, and extends equipment lifespan.
- Implementing short, focused drills like balance point holds, towel snaps, and flat-ground command maximizes training efficiency within tight time frames.
- Using a fixed 9-zone target on a portable net offers clear visual cues for pitch placement, track progress, and build consistency over time.
Table of Contents
- Lefty Pitcher Net Setup: The Assembly and Placement Checklist
- How Do You Set Up a Net for a Left-Handed Pitcher?
- Anchoring and Wind Safety for a Portable Pitching Net
- Lefty Bullpen Drills You Can Run With a Net in 30 Minutes
- Keeping the Net Safe and Working Over Time
- Why the Pitchtrainingbaseball Target Net Fits This Setup
- Fixing Common Lefty Setup Problems
- A Coach’s Real-World Take on Lefty Net Setups
- Get the Net Setup Right the First Time
- Sources
Lefty Pitcher Net Setup: The Assembly and Placement Checklist
Getting a lefty pitcher net setup right starts before anyone throws a ball. Most tipping problems, cutout mistakes, and wasted practice time trace back to the ten minutes of assembly nobody rushed through carefully.
Start with size. A backyard or driveway session works fine with a 7x7 or 8x8 net, but if you’re running full-speed bullpens, size up to a 9x9 or 10x10 so mis-hits and wild pitches don’t sail past the frame. Bigger nets also give you more surface area to mount a target, which matters once you get into command work.
Here’s the assembly order that actually saves you rework:
- Lay out every pole, joint, and net panel before you connect anything, so you’re not hunting for the missing piece halfway through.
- Assemble the frame on flat ground, checking that all joints seat fully. A loose joint at setup is a collapsed net mid pitch.
- Attach the netting and tension it evenly across the frame. Sagging netting absorbs impact poorly and wears out faster.
- If you’re using an L-screen, confirm the cutout orientation now, before you square it to the mound. This is the step lefty setups get wrong most often, and fixing it after the fact means unbolting and rotating panels you just tightened.
- Lock the wheels if the screen has them, or set the base weights. A screen on unlocked wheels will creep forward with every impact.
Distance depends on what you’re working on that day. For full-speed bullpen work, placing an L-screen 45 to 55 feet from home plate, tilted slightly toward the plate, gives a realistic look while keeping the pitcher protected. Dial it back to 30 to 35 feet for short-box work, and 10 to 15 feet for front toss with younger kids who are still building arm strength.
Before anyone throws, run a 60-second safety check. Look at the laces for fraying, press on each frame joint to confirm it’s seated, check that anchor weights are actually holding, and make sure the area behind the net is clear of walkways, parked cars, or younger siblings chasing foul balls.
Pro Tip: Set the net up the night before a Saturday practice if you can. Nets settle and netting stretches slightly overnight, and you’ll catch a loose joint in daylight instead of scrambling five minutes before kids show up.
Beginner guides on outdoor net setup consistently point to the same fix for tipping and shifting: secure the base with sandbags or ground stakes rather than trusting the frame’s own weight, especially on grass or gravel where footing isn’t solid.
How Do You Set Up a Net for a Left-Handed Pitcher?
A right-handed setup doesn’t just feel slightly off for a lefty pitcher. It actively gets in the way of the throwing arm, and that’s the detail most backyard setups miss entirely.
Flip the L-screen cutout so the opening sits on the pitcher’s left side. Screens ship configured for a right-hander by default, and if you leave it that way, the frame edge sits directly in a lefty’s arm path on the way through release. Matching the cutout to the thrower’s arm side isn’t a nice-to-have adjustment. It’s the difference between a screen that protects the pitcher and one that clips an elbow mid-delivery.
Once the cutout is flipped, nudge the whole net a step or two toward the first-base side of the pitch line. This keeps the frame out of the pitcher’s natural arm swing while still presenting a realistic angle to the plate. Skip this offset and you’ll either watch the pitcher shy away from the net (which wrecks their mechanics) or clip the frame on the follow-through.
A few lefty-specific things worth knowing as you set targets and watch mechanics:
- Lefties tend to land slightly closed compared to a mirror image of a righty’s mechanics, which shifts their release point a few inches toward first base.
- A sewn or taped 9-zone target mounted on the net gives you a fixed reference for command drills, and it’s more useful than a bare net because you can track which quadrants a pitcher consistently misses.
- Mark a “lefty pocket” low and away to a right-handed batter (up and in to a lefty batter) since that’s the count-getter location most youth lefties need to groove early.
- Development experts recommend sequencing pitch types by age for young lefties, prioritizing fastball command first, changeup second, and holding off on breaking balls until around ages 11 to 14.
Left-handed pitchers are a minority on most rosters, and that scarcity means fewer coaches have hands-on reps adjusting a net specifically for one. The flip-and-offset routine above takes about 30 extra seconds once you’ve done it a handful of times.
Anchoring and Wind Safety for a Portable Pitching Net
A net that tips over mid-drill isn’t just annoying. It’s how framed corners end up denting a fender or catching a kid in the shins.
Your anchor choice depends on your surface. Sandbags work everywhere and pack down small enough to toss in a trunk, which makes them the right call if you’re moving the net between the backyard and a field. Ground stakes drive into turf or dirt and hold better than sandbags in steady wind, but they’re useless on concrete or asphalt. If you’re running an L-screen with wheels, lock them and add a weighted base. Wheels that aren’t locked will walk forward every time a ball hits the netting.
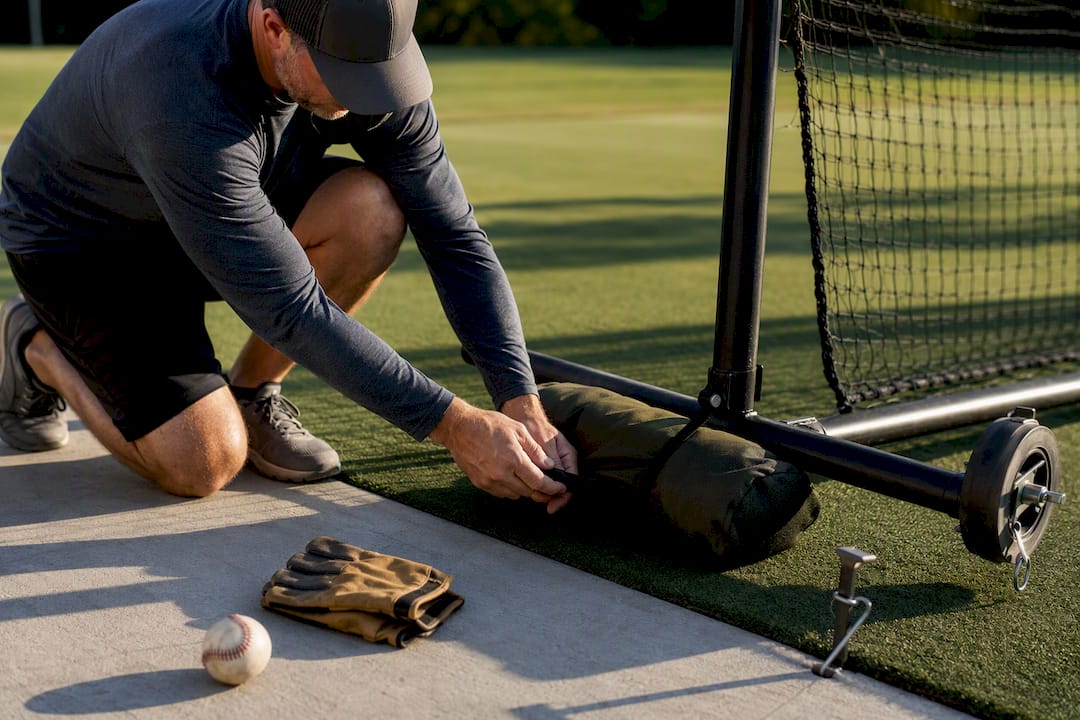
Wind is the variable most families underestimate. A steady breeze around 15 to 20 mph is usually fine for a properly staked net, but gusts above that start testing even a well-anchored frame, and a net that’s just sitting on its own weight with no stakes or sandbags can go over in far less. If you see the frame rocking or the base lifting on gusts, that’s your sign to pack it in rather than push through the session.
Before every practice, a quick look-over catches most problems before they become injuries:
- Check laces and netting for fraying, especially near the frame connection points where friction wears fastest.
- Press each frame joint to confirm nothing has worked loose since the last session.
- Confirm anchor weights are still in place. Sandbags shift, and stakes can work themselves partway out over repeated use.
- Glance at wheel locks on any screen that has them.
Pro Tip: Pick your spot with your house, not just the pitcher, in mind. Face the net away from windows and parked cars, and give yourself at least 10 extra feet of buffer behind the net for wild pitches and passed balls, since a young lefty working on a new pitch will miss the target more than you’d expect.
Lefty Bullpen Drills You Can Run With a Net in 30 Minutes
The net earns its keep here. It’s not just a backstop, it’s what lets you run mechanics work at a pace that actually builds command instead of just burning through pitch counts.
Short, focused drill blocks of 8 to 10 minutes each build command faster than long, unstructured throwing sessions, and they’re easier on a young arm. Three drills form the core of almost any productive lefty bullpen:
- Balance point hold. The pitcher lifts the front leg to their normal load position and holds for a two-count before continuing the delivery. No net needed for this one, but running it right before net work grooves the same balance the net drills reinforce.
- Towel drill. Swap the ball for a hand towel and have the pitcher work through a full delivery, snapping the towel at a target on the net. This isolates arm path and follow-through without ball flight distracting from the mechanics.
- Flat-ground command. Full delivery, real ball, throwing into the net’s 9-zone target from 30 to 35 feet. This is where you start tracking actual strikes against specific zones.
A simple 30-minute session might look like this:
Age matters more than ambition here. Pitch-count guidance runs around 50 pitches for ages 7 to 8, 75 for ages 9 to 10, and 85 for ages 11 to 12, and that count includes bullpen work, not just game innings. Our pitch-count safety guide breaks this down further by age and pitch type.
Tracking progress doesn’t require anything fancy. Count strikes into the target zone out of every 20 throws and log it weekly. A pitcher hitting 8 out of 20 in week one and 13 out of 20 a month later is showing real command growth, and that number matters more than velocity at this age. Pairing this with structured daily habits between sessions compounds the gains faster than bullpen work alone.
Keeping the Net Safe and Working Over Time
Test any new net before trusting it with full-speed work. Start with light tosses from half distance, move to medium-effort throws, then work up to full speed once the frame and netting have held through a few dozen impacts without shifting or sagging.
After that, a simple maintenance rhythm keeps things safe for a full season:
- Inspect connection points and netting after roughly every 10 sessions, and again after 50 and 100 cumulative impacts.
- Retighten frame joints monthly, since repeated impact vibration loosens hardware over time.
- Replace netting once you see holes near the frame or noticeable sag that tension adjustments won’t fix.
- Retire a frame outright if a pole bends or a joint cracks. Patched frames fail unpredictably, usually at the worst moment.
Why the Pitchtrainingbaseball Target Net Fits This Setup
Everything above points toward one conclusion: youth lefty pitchers need a net built around a fixed target, an orientation that respects the throwing arm, and hardware that holds up to repeated impact.
The Pitchtrainingbaseball pitching target net with a strike 9-zone is built around exactly that structure. Instead of a blank net where a coach has to eyeball location, it gives pitchers a sewn, color-coded zone system, which turns the “hits per 20 throws” tracking method into something a nine-year-old can see for himself.
Here’s how the features line up with what a lefty setup actually needs:
- Fixed 9-zone target gives an immediate visual for the lefty pocket and away-zone work described earlier.
- Portable frame supports the sandbag or stake anchoring covered in the safety section, without the bulk of a full cage.
- Consistent sizing works for short-box command drills at 30 to 35 feet and scales up for full-speed bullpen work at 45 feet.
| Drill type | Best net use case |
|---|---|
| Front toss / early mechanics | Close-range target work, ages 7-9 |
| Short-box command | 30-35 ft zone accuracy tracking |
| Full-speed bullpen | 45 ft realistic game-angle reps |
For families building out a full home setup, pairing the target net with safe, age-appropriate training tools rounds out a season’s worth of practice without needing a batting cage.
Fixing Common Lefty Setup Problems
Most complaints about a “bad net” trace back to setup, not the equipment itself, and lefty households run into a specific handful of repeat issues.
The net still feels crowded even after flipping the cutout. You flipped the screen, but didn’t move the frame’s overall position. Flipping the cutout alone doesn’t fix a net that’s still centered as if the pitcher were right-handed. Shift the whole unit a step toward first base after flipping the opening, not just the cutout panel.
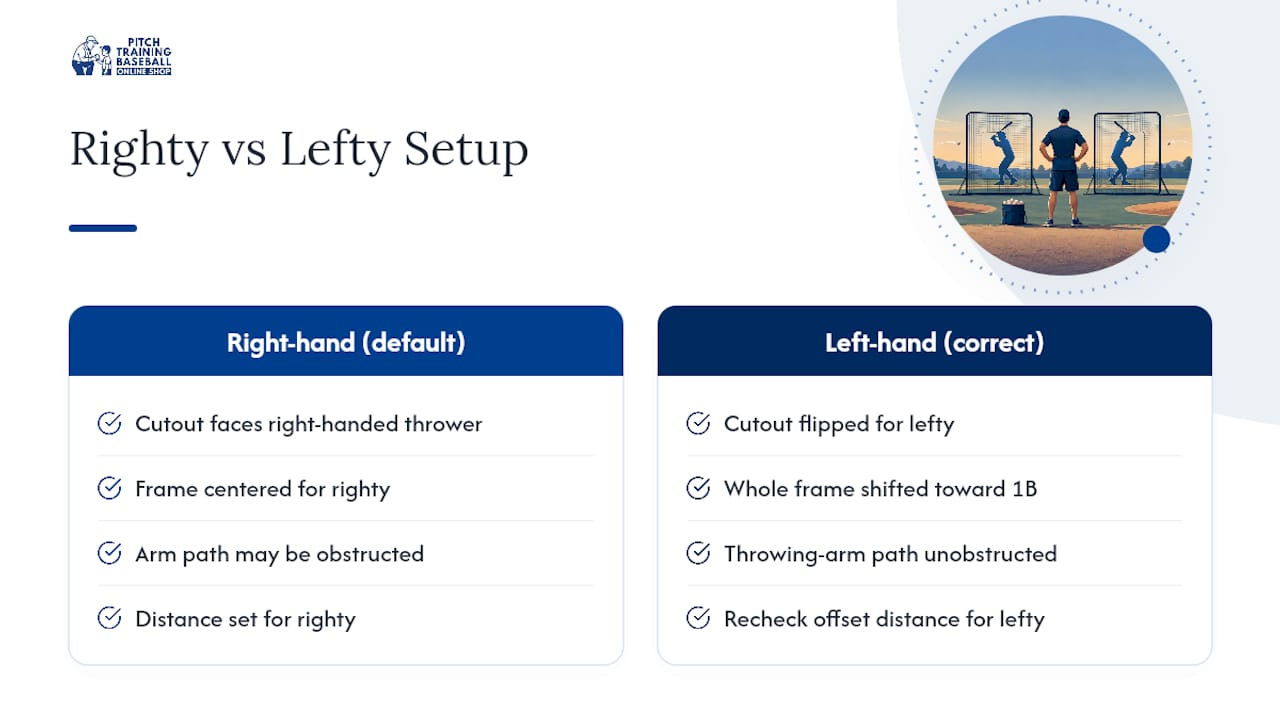
The pitcher is drifting away from the target mid-delivery. This usually means the net is positioned too close to the arm path even after the offset, often because the mound-to-net distance was measured for a righty setup and never adjusted. Recheck the offset distance, not just the direction.
Wheels keep creeping forward on impact. This is almost always a skipped step, not a bad screen. Wheel locks get missed constantly, especially by a helper setting up while a coach is running warm-ups elsewhere. Make wheel locks part of the same checklist as anchor weights, not an afterthought.
The 9-zone target looks mismatched for a lefty’s natural miss pattern. If a pitcher consistently misses to the same side regardless of target placement, that’s a mechanics issue showing up as a net complaint. Log the miss pattern for a session or two before assuming the setup itself needs another adjustment.
A Coach’s Real-World Take on Lefty Net Setups
The setups that work best aren’t complicated. A weekend session that starts with the net staked down, the cutout flipped, and a target already taped or sewn on, gets straight into 30 minutes of mechanics work instead of losing 15 minutes to fiddling with frame joints.
Two things make the biggest difference day to day. First, keep drill blocks short. A nine-year-old’s focus holds for about 8 to 10 minutes before quality drops, so switching drills on a timer beats grinding through one long block. Second, respect the wind before it becomes a problem. If gusts are rocking the frame during warm-ups, that’s the moment to add another sandbag or call it, not after a screen has already gone over.
— Albert
Get the Net Setup Right the First Time
A blank net tells a pitcher where not to throw the ball into the backstop. It doesn’t tell them where to aim. That’s the gap between a setup that just contains wild pitches and one that actually builds command, and it’s the difference the target zone makes over a season of practice.

The Pitching Target Net with Colorful Strike 9-Zone gives you the fixed target this whole setup depends on, in a frame sized right for both short-box command work and full-speed bullpens. Pair it with a set of training balls for controlled toss work, and you’ve got everything covered in the drill sequences above without building out a full cage. If leg drive and stride mechanics are part of your pitcher’s work this offseason, this guide to explosive leg power pairs well with the balance-point drills covered earlier.
Head to the product page to check sizing options and get one set up before your next bullpen session.
Sources
- Youth Pitching Drills: A Baseball Coaching Guide — Veo
- Maximizing baseball & softball training with L screens — Trigon Sports
- Beginner’s guide to setting up a baseball practice net — Riches Net (industry guide)