


Run this pitching mechanics checklist before a bullpen, after any complaint of arm soreness, or once a week during the season, and you’ll catch the mechanical faults that lead to lost velocity and lost seasons before they become permanent problems. The checklist walks through six phases of the delivery, from setup to follow-through, with measurable checkpoints anyone can score in about two minutes. If a pitcher reports elbow or shoulder pain that lingers past a day of rest, stop throwing and get evaluated by a sports medicine clinician before any drill work resumes.
TL;DR:
- Fixing balance issues at the leg lift stage through single-leg stability drills can significantly improve consistency and reduce injury risk.
- Monitoring stride length to 80-85 percent of height and foot positioning within 15 degrees of the target optimizes balance and trunk control.
- Recording and reviewing side and front videos of pitches reveal faults like arm cross-over and early trunk opening that live coaching may miss.
- Prioritizing workload management, including warm-up routines and rest days, has a proven impact on preventing arm injuries in youth pitchers.
- Corrective drills should focus on one specific fault at a time, with video feedback and targeted practice balls to avoid overloading young arms.
Table of Contents
- What Does a Complete Pitching Mechanics Checklist Cover?
- Common Mechanical Errors and the Drills That Fix Them
- How Should You Handle Warm-Ups, Pitch Counts, and Age Limits?
- How Do You Run a Quick Assessment on the Field?
- Who’s Behind This Checklist and How Should You Use It?
- A Coach’s Honest Take on Mechanics Obsession
- Training Aids That Make This Checklist Easier to Run
- Sources
- FAQ
What Does a Complete Pitching Mechanics Checklist Cover?
A real mechanics evaluation moves phase by phase through the delivery, catching problems where they actually start instead of guessing from a single glance at the finish. Most coaches watch the arm. The better habit is watching the legs first, because almost every arm problem traces back to a base that never got set correctly.
Here’s the full phase breakdown, with the specific checkpoints worth measuring at each stage.

1. Setup: stance and communication
Before the first movement, check three things. The pivot foot should sit flush against the front edge of the rubber, not perched on top of it. The pitcher should have a clear sign or nod exchanged with the catcher, even in bullpen work, to build the habit of pitching with intent rather than just chucking the ball. And the glove should sit at a consistent chest height, not drifting from pitch to pitch, since inconsistent glove position is often the first visible sign of rushing.
2. Balance and leg lift
This is the single most underrated checkpoint in the entire delivery. Have the pitcher lift the front knee to its highest point and hold there for a two count without wobbling, arm-flailing, or leaning toward second base. A pitcher who can’t hold that position cleanly for two seconds has no chance of repeating a release point under game pressure. Watch the head, too. It should stay stacked over the back hip, not tipping forward early.
3. Stride and foot contact
Stride length is one of the few checkpoints you can measure with a tape measure instead of a guess. A workable target is a landing distance around 80 to 85 percent of the pitcher’s standing height, measured from the rubber to where the lead foot plants, according to the mechanics benchmarks published by Lehman’s Baseball. Shorter than that and the pitcher is likely relying on arm strength alone. Longer than that and balance usually collapses on landing.
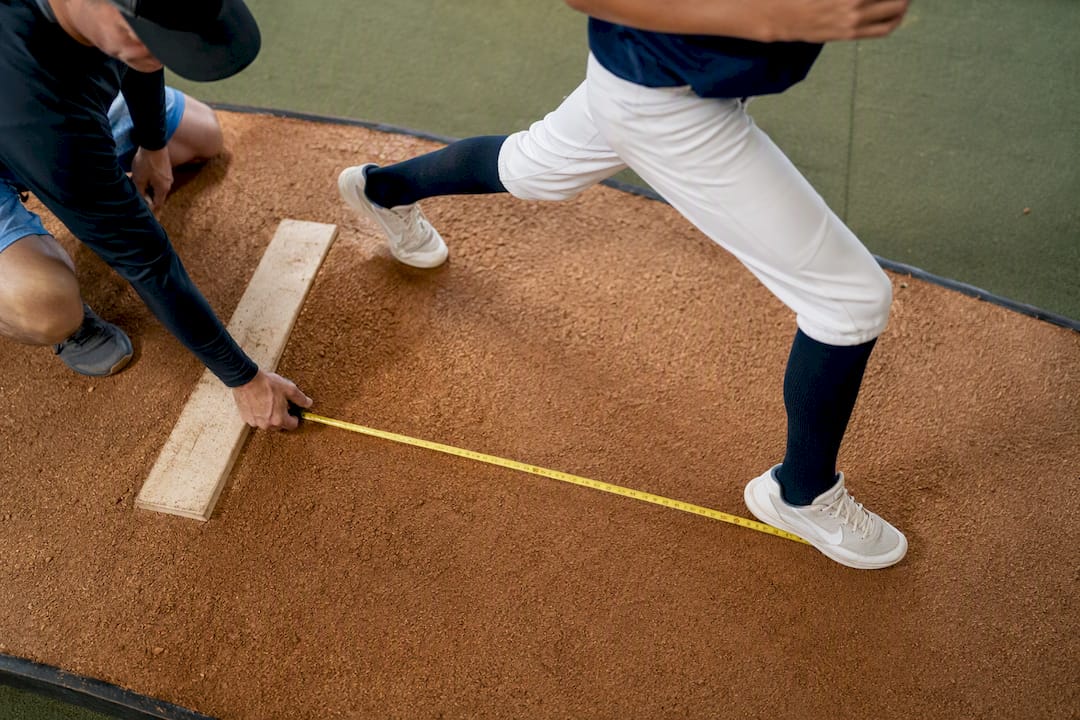
The lead foot should point somewhere between straight at the plate and slightly closed, roughly 10 to 15 degrees off a direct line to the target. A foot that lands wide open toward third base (for a right-hander) is one of the most common faults on this entire list, and it’s a major driver of early trunk rotation.
4. Arm cocking and layback
At foot contact, the throwing arm should be in a roughly 90-degree elbow bend, often described as a “high five” position with the ball facing away from the hitter. The shoulder should show visible external rotation, meaning the forearm lays back toward the outfield rather than staying tucked. This layback is normal and necessary. What’s not normal is a completely straight, locked elbow at this point, which usually signals the arm dragging behind the body rather than working in rhythm with it.
5. Acceleration and release
Release should happen out in front of the lead foot, not directly over it and never behind it. A simple towel test works well here: have the pitcher hold a hand towel and go through a slow-motion delivery, snapping the towel at release. Watch whether the towel path stays inside the frame of the body or whips out wide, which signals the arm cutting across rather than driving straight through.
6. Follow-through and fielding position
The back leg should finish forward, with the pitcher’s chest ending up over or past the lead knee, squared toward the plate. A pitcher who finishes standing tall with the back leg still planted behind them is decelerating poorly, and that’s a pattern that shows up again and again in pitchers with recurring shoulder complaints. Check whether the pitcher lands in an athletic position, glove up, ready to field a comeback ball. If they’re falling off toward first base after every pitch, that’s a red flag worth drilling immediately.
Recording this from two camera angles turns a fuzzy impression into an actual diagnosis. Set one phone at the side, roughly in line with the pitching rubber and home plate, to capture stride length, trunk lean, and arm path. Set a second phone behind the pitcher, facing home plate, to check foot direction and shoulder alignment. Video review at these two angles reveals faults that live coaching regularly misses, according to pitching drill guidance from Veo, because the human eye simply can’t track a full-speed delivery and isolate six separate checkpoints at once. Use slow-motion playback and pause at three frames specifically: top of leg lift, foot contact, and release.
Here’s the condensed scoring list you can print or screenshot for the field:
- Pivot foot flush on the rubber, consistent glove height
- Balance hold of at least two seconds at top of leg lift, no head drift
- Stride length near 80 to 85 percent of height, lead foot within 15 degrees of the target line
- Elbow near 90 degrees at foot contact with visible shoulder layback
- Release point out in front of the lead foot, towel path staying inside the body frame
- Follow-through finishing chest-over-knee, athletic fielding position on landing
Common Mechanical Errors and the Drills That Fix Them
Failing a checklist item isn’t a diagnosis. It’s a starting point. Each fault below maps to a specific, low-risk drill you can run in the same practice session, without adding throwing volume.
- Poor balance at leg lift. If the pitcher wobbles or can’t hold the position, drop the throwing entirely for a session and work single-leg stability. Have them balance on the lead leg with eyes closed for 10 seconds, three rounds, then repeat the leg lift and hold from the mound without a ball. This is pure coordination work, not conditioning, and it transfers fast.
- Stride crosses the midline or points the wrong direction. Lay a strip of field tape or a throw-down line from the rubber to the target and have the pitcher land their front foot on it for 10 reps. This single visual cue fixes foot direction faster than verbal correction ever does, because the pitcher gets instant feedback on every rep instead of waiting for a coach to call it out.
- Arm path cuts across the body. Run the towel drill described above for five slow reps, then progress to a wall trace drill: stand the pitcher a few feet from a fence and have them walk through the arm circle without contacting it. If the towel or the hand keeps drifting wide, the fix usually isn’t the arm at all. It’s a hip that’s opening too early and pulling the arm off its natural path.
- Trunk opens too early. This one is often mistaken for an arm problem when it’s really a timing problem. Step throws are the fix: have the pitcher take a short step and throw with exaggerated hip lead before the shoulders turn, focusing purely on the sequence rather than velocity. Hip rotation timing drills, done at half speed, retrain the separation between hips and shoulders that gets lost when a young pitcher rushes.
Pro Tip: Never chase two corrections at once. Pick the single biggest fault on the checklist, drill only that for a full week, and re-film before adding a second fix. Stacking corrections is how pitchers end up more mechanical and less athletic.
Age matters here. Players under 14 should stick to low-effort versions of every drill above and prioritize coordination over intensity. Their job is learning the pattern, not proving they can throw hard. If a video review shows a fault that doesn’t clear up after two or three weeks of targeted drill work, or if any drill reproduces pain, that’s the point to bring in a coach with formal video analysis experience or refer out to a sports medicine clinician rather than continuing to self-correct.
How Should You Handle Warm-Ups, Pitch Counts, and Age Limits?
Mechanics only matter if the arm behind them isn’t already overloaded. A short, structured warm-up cuts injury risk dramatically. A randomized trial testing a 10-minute warm-up program, five stretches, two dynamic mobility drills, and two balance exercises, found it cut injury incidence by roughly 50 percent in young players compared to standard warm-up routines. That’s one of the largest effect sizes in youth arm-care research, and it costs nothing but 10 minutes before practice or a game.
Run the same 10-minute sequence every time, in this order:
- Five static or PNF stretches targeting shoulder, wrist, and forearm
- Two dynamic mobility movements, such as arm circles and leg swings, to raise core temperature
- Two balance drills, like single-leg holds, to prime the same stability the checklist tests for
Pitch counts and rest days remain the backbone of workload management, and Little League publishes age-banded limits that scale rest days to how many pitches were thrown, not just the pitcher’s age. A 9 to 10 year old throwing 66 or more pitches in an outing needs four full days of rest before pitching again; a 13 to 16 year old crossing similar thresholds needs the same. The exact numbers shift by age bracket, which is why checking the Little League chart directly, rather than relying on memory, matters every single week of the season. USA Baseball’s Pitch Smart program tracks closely with those same age-banded limits and adds guidance on appearance limits across multiple teams, which matters more than most parents realize once travel ball overlaps with a rec league schedule.
Breaking pitches deserve their own caution. Growth plates in the shoulder and elbow are still developing through the early teens, and medical guidance is consistent: pitchers younger than 14 should stick to fastballs and changeups, saving curveballs and sliders for later. A substantial portion of young throwers develop some form of overuse injury, and pain is typically the first warning sign, one that should never be pitched through. Our guide on age-appropriate pitch selection breaks down exactly when to introduce each pitch type.
Workload doesn’t stop at the mound. Track every throwing session across all teams a player is on, including travel ball, showcases, and backyard sessions with dad, since specialization and high total volume are directly linked to higher injury rates. Build in three to six months of active rest each off-season, and enforce a real cool-down window, ideally 24 to 48 hours, after any high-effort game outing before the next throwing session. Our breakdown of recommended rest strategies covers how to build that into a season calendar without losing development time.
How Do You Run a Quick Assessment on the Field?
A full assessment takes 10 to 15 minutes and gives you numbers you can compare week to week, instead of a vague sense that “the mechanics looked better today.”
- Warm-up (3 minutes). Run the 10-minute program’s balance and mobility pieces at a compressed pace to get the pitcher moving.
- Balance-hold test (2 minutes). Time the leg-lift hold three times and record the best of three in seconds.
- Mobility check (3 minutes). Check shoulder rotation and hip internal rotation by eye or with a basic goniometer if the coach has one, comparing throwing side to glove side. Real asymmetries between the two sides correlate with elbow injury risk, according to research on youth throwing injuries, and this comparison is worth doing even without special equipment since a visible difference is itself useful information.
- Flat-ground throws (5 minutes). Have the pitcher throw 20 pitches at 60 to 75 percent effort to a target, tracking accuracy.
- Video capture (2 minutes). Film the last 10 throws from side and front angles for review later.
Log the results in a simple table so trends show up over weeks instead of getting lost in memory.
| Metric | How to measure | What to watch for |
|---|---|---|
| Balance-hold time | Seconds held at top of leg lift | Under 2 seconds signals instability |
| Stride length | Percent of standing height | Target 80 to 85 percent |
| Accuracy | Strikes out of 20 flat-ground throws | Sudden drops suggest fatigue or fault |
| Rotation asymmetry | Throwing side vs. glove side, by eye or goniometer | Large gaps warrant referral |
Refer out immediately if a pitcher reports pain during or after the test, shows a large and obvious asymmetry between sides, or simply can’t hold the balance position at all after several attempts. Otherwise, retest every two to three weeks using the same sequence, and track whether balance-hold time and stride consistency are trending up. Improvement here shows up before velocity does, which is exactly why this test is worth running before chasing radar gun numbers.
Who’s Behind This Checklist and How Should You Use It?
This checklist was put together by Albert at Pitch Training Baseball, drawing on published pitch-count guidelines, peer-reviewed injury-prevention research, and the practical coaching resources referenced throughout this piece. Pitch Training Baseball builds its product line and educational content around the same principle: repeatable mechanics and managed workload matter more than raw arm strength, especially before age 14.
None of this replaces a medical evaluation. If pain shows up at any point in a bullpen, drill, or game, stop throwing that day and have it checked by a clinician before returning to any mound work. Used responsibly, the checklist fits into a normal weekly plan: run it once before the first bullpen of the week, track results, and adjust drill focus rather than adding throwing volume. Our piece on why proper technique matters for young players goes deeper into the injury research behind this approach.
A Coach’s Honest Take on Mechanics Obsession
Most coaches over-teach. I’ve seen bullpens where a kid gets six different cues on a single pitch, elbow height, hip timing, glove position, front side, and walks away more confused than when he started. Keep it simple: one fix at a time, and let balance and repeatability lead before velocity ever enters the conversation.
Workload management beats mechanical perfection every time. A pitcher with slightly imperfect mechanics who’s well rested will outlast a textbook thrower who’s overworked. My mantra for any coach reading this: watch the feet before you watch the arm, and count every pitch like it’s the only one that matters. The immediate action worth taking this week is simple. Film one bullpen, run the balance-hold test, and fix nothing else until you’ve seen the numbers.
— Albert
Training Aids That Make This Checklist Easier to Run
A checklist is only as useful as the practice session built around it, and two tools from Pitch Training Baseball map directly onto the checkpoints above. A pitching target net with a nine-zone strike layout turns the accuracy portion of the field assessment into something a pitcher can actually see and chase, rather than guessing whether a throw missed low or outside.

For the volume-heavy corrective drills, like stride-line reps and towel-path work, a safer ball reduces cumulative arm stress without cutting the reps that actually build the pattern. A set of low-impact practice balls lets a pitcher run 20 or 30 reps of a fix in one session at a fraction of the joint load of a regulation ball. Pair the two in a 20-minute session: 10 minutes of target-net accuracy work post warm-up, then 10 minutes of drill-specific reps with the lighter ball, filming the last five throws for the next assessment. If you’re building out a home practice setup around this checklist, the target net product page is the place to start.
This article is general information, not a substitute for advice from a qualified doctor. Consult a qualified healthcare professional about your own circumstances before acting on anything here.
Sources
- PubMed Central - youth pitching growth plate guidance
- Throwing Injuries and Prevention Strategies in Youth Baseball (2024)
- Little League - Regular season pitching rules (pitch counts)
- MLB, USA Baseball announce updates to Pitch Smart program
FAQ
What Are the Proper Mechanics for Pitching in Baseball?
Proper mechanics follow a sequence: a balanced leg lift, a stride landing at 80 to 85 percent of the pitcher’s height with the foot pointed near the target, an elbow near 90 degrees at foot contact, and a release out in front of the body followed by a full, chest-over-knee follow-through.
Is Throwing 70 MPH at Age 14 Good?
For most 14 year olds, velocity varies widely by size, training age, and mechanics, and it matters far less than whether the pitcher can repeat that delivery pain-free across a full outing.
What Colors Can Pitchers Not Wear?
Pitchers generally can’t wear gloves, shirts, or wristbands that match the color of the ball, typically white or gray, since that creates a safety and fairness issue for hitters trying to pick up the pitch out of the hand.
How Many Pitches Should a 12 Year Old Throw?
Pitch limits follow Little League’s age-banded chart, and daily maximums plus required rest days scale with how many pitches were thrown that outing. Check the current Little League pitch-count table directly, since limits are set per age bracket rather than as one flat number.