


A safe, repeatable curveball is a fastball delivery with a topspin release, and youth pitchers should learn it gradually through flat-ground drills, strict pitch counts, and maturity-based readiness checks. Before adding one to a game plan, confirm three things:
- Fastball command is already solid and repeatable
- The change-up is comfortable and gets thrown with confidence in real counts
- The pitcher shows physical readiness (strength, stability, and the fastball arm slot doesn’t change under fatigue)
Follow Pitch Smart’s pitch-count and rest guidance at every step, and stop immediately for any joint pain, not just soreness.
Pro Tip: If a pitcher can’t throw 10 fastballs in a row to the same spot with a consistent arm slot, they aren’t ready for curveball work yet. Fix the fastball first.
Key Takeaways
A safe curveball comes from a fastball-identical arm slot, topspin created by finger pressure rather than wrist snap, and a gradual progression governed by pitch counts and physical readiness, not calendar age.
| Point | Details |
|---|---|
| Master the fastball first | Fastball command and arm slot consistency come before any curveball grip work. |
| Use a finger-roll release | Topspin comes from the middle finger rolling the ball, not a late wrist snap. |
| Follow pitch-count limits | Apply Pitch Smart age-based counts and rest days to every curveball session. |
| Judge readiness by maturity | Strength, stability, and physical development matter more than birthdate alone. |
| Train with lower-stress gear | Soft balls and target nets from Pitchtrainingbaseball support safe, focused reps during early progression stages. |
Table of Contents
- What Happens When You Throw a Curveball
- Curveball Grips That Are Safe for Young Hands
- Building the Mechanics Before Adding Any Intent
- Drills That Build Topspin Without Overloading the Arm
- When Is a Young Pitcher Ready to Throw a Curveball?
- When to Throw It in a Game
- Fixing the Most Common Curveball Problems
- Warm-Up Routines That Protect the Elbow and Shoulder
- Warning Signs That Mean It’s Time to Stop
- Training Tools That Make Curveball Practice Safer
- Frequently Asked Questions
- Sources
What Happens When You Throw a Curveball
A curveball is a pitch gripped and released to create topspin, so it drops later and more sharply than a fastball thrown from the same arm slot. The spin axis runs roughly perpendicular to the flight path, the ball typically arrives 8 to 12 mph slower than a fastball, and the best ones “tunnel,” meaning they look identical to a fastball out of the hand before breaking late.
That last part is what actually fools hitters. A curveball with early, obvious break is a batting practice pitch. A good one hides its identity for the first 20 to 25 feet.
Here’s what a clean curveball looks and feels like in practice:
- The arm speed matches the fastball, with no visible deceleration before release
- The ball comes out with tight, consistent topspin instead of a wobble
- The break shows up late, not immediately out of the hand
Curveball Grips That Are Safe for Young Hands
Grip matters more than effort here. A good grip creates spin through finger placement and a natural wrist position, not through twisting or snapping.
- Standard two-finger curve. Place the index and middle fingers together along one of the horseshoe seams, thumb resting underneath on a smooth patch of leather. The middle finger applies most of the pressure at release.
- Spike curve (one-finger variation). The index finger bends at the first knuckle and rests on its tip against the seam, while the middle finger does the driving. Some pitchers find this reduces unwanted side-spin.
- Youth “chop” curve. Fingers sit slightly off-center on a two-seam grip with light pressure from the middle finger. This variation is easier for smaller hands that can’t comfortably span a standard curveball grip yet.
For fingertip pressure, think “roll,” not “yank.” The middle finger pulls down and slightly across the ball as it leaves the hand, similar to flicking water off your fingers.
Smaller hands should start with the youth chop grip and test the standard two-finger grip once the hand grows enough to hold it without straining. Never force a grip that requires stretching the fingers uncomfortably wide.
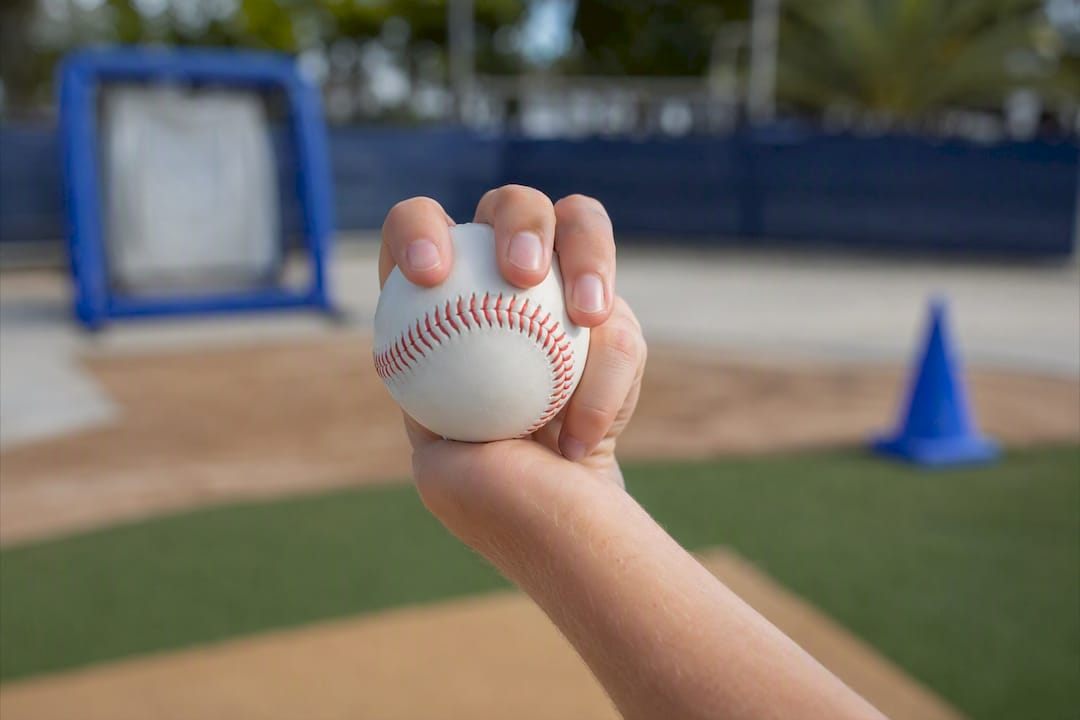
Pro Tip: Have the pitcher hold the grip and show it to you before every early bullpen session. If the wrist looks cocked or bent sideways at address, the grip is wrong before the ball is even thrown.
Building the Mechanics Before Adding Any Intent
Before a curveball ever leaves the hand with real effort, the fastball delivery needs to be locked in: a repeatable arm slot, a consistent stride length, and proper hip-shoulder separation. If those checkpoints aren’t there yet, curveball work should wait.
Once the fastball is reliable, move through this progression:
- Grip and finger-roll reps, seated or kneeling, with no lower body involved
- Short flat-ground tosses at 15 to 30 feet, focused purely on spin, not speed
- Medium-distance throws at 45 to 60 feet with the normal fastball arm path
- Mound work with partial intent, monitored closely for arm slot changes
- Full-intent bullpen integration, mixed sparingly with fastballs and change-ups
The release cue that matters most: let the fingers roll the ball forward and down, rather than snapping the wrist late. Arm speed should look identical to the fastball all the way through release.
A dropped elbow or a sudden wrist twist at release is the clearest sign that a pitcher is trying to create spin with force instead of grip and finger action. When you see it, stop the drill and reset at the previous progression step.
Coaches should watch for these warning signs during every session:
- Elbow dropping below shoulder height at release
- A forced, late wrist snap replacing a smooth finger roll
- Arm speed slowing down noticeably before the ball leaves the hand
Drills That Build Topspin Without Overloading the Arm
Good curveball drills strip away variables so the pitcher can focus on spin quality first, and add speed and distance only once that spin is consistent.
- Finger-roll reps into a net or soft target, no windup
- Knee/chop drill: throwing from a kneeling position to remove stride momentum, which reduces load while the fingers and release get more repetitions in
- Short-distance topspin toss at 15 to 20 feet, checking for consistent rotation
- Wall or net target reps to build accuracy alongside spin
- Mixed bullpen sets: three fastballs, one curveball, repeated in sequence
- Slow-motion video review of the release point every few sessions
A simple three-week plan for a pitcher who has fastball command and change-up comfort:
- Week 1: Grip and finger-roll reps only, three sessions, 10 to 15 reps each, no mound
- Week 2: Add short flat-ground tosses, two sessions, 10 curveball reps mixed with fastball work
- Week 3: Introduce low-intent mound work, one session, 10 to 12 curveball reps inside a mixed bullpen
Pro Tip: A basic slow-motion camera app is enough to check the release window. Watch for the wrist staying firm through release rather than flicking late, that single detail tells you almost everything about whether the pitch is being thrown safely.
When Is a Young Pitcher Ready to Throw a Curveball?
Calendar age is a weak signal on its own. Physical maturity, tested through simple strength and stability checks like lunges and planks, along with the biological markers pediatric sports medicine sources point to, predicts readiness far better than birthdate does. Pediatric guidance commonly suggests age 14 as a rough minimum for curveballs, but that number is a floor, not a green light on its own.
Skeletal maturity and basic strength testing matter more than the number of birthdays a pitcher has had. A physically underdeveloped 14-year-old is not more ready than a well-developed 13-year-old with excellent fastball mechanics.
Before introducing the pitch in games, run through this checklist:
- Fastball command is reliable across multiple locations
- The change-up gets thrown with confidence in real counts, not just in the bullpen
- Basic strength and stability tests (lunges, planks) show no major weaknesses
- The pitcher shows physical maturity markers beyond just age
A prospective study of 9 to 14 year old pitchers found curveball use was associated with a 52% jump in shoulder pain risk over a single season, though the same research flagged pitch counts and mechanics as significant contributing factors. Meanwhile, a broader review of pitch-type research found fastballs often generate higher shoulder and elbow torque in biomechanical testing, which is why ASMI’s position statement recommends teaching pitches in strict sequence: basic throwing, then fastball, then change-up, before any breaking ball enters the picture. Any joint pain, not just fatigue soreness, is a stop signal, not a “push through it” moment.
When to Throw It in a Game
Tunneling is what makes a curveball dangerous to hitters: it needs to travel the same early flight path as the fastball before breaking late, so the batter commits before recognizing the pitch.
For a young pitcher just adding the pitch, frequency should stay low, roughly one to two curveballs per inning at first, so the fastball and change-up stay the primary weapons.
Situational sequencing that works well early on:
- Fastball for a strike, then curveball as the show-me pitch once ahead in the count
- Curveball after two fastballs in a row, so the hitter has a fresh visual reference to be fooled by
- Save it for hitters who are clearly sitting on fastball speed
Watch hitter reactions closely. A late, weak swing means the tunnel is working. An early swing or a take shows the pitch is either too obvious out of the hand or breaking too soon to be deceptive.
Fixing the Most Common Curveball Problems
- Flat pitch, no drop: Usually a pressure problem. Adjust middle-finger pressure and slow down the wrist snap; the flick usually means the fingers aren’t doing the work.
- Ball sails glove-side: Check the finger position at release, it’s often drifting to one side of the seam.
- Excessive wrist snap: Go back to finger-roll reps at close range until the roll replaces the snap.
- Arm soreness after sessions: Cut curveball reps immediately and reassess mechanics before adding any back.
Never increase curveball reps on a day the pitcher already feels tired, even if the bullpen “still has time left.” Fatigue is exactly when bad habits get grooved into muscle memory.
Numbness, tingling, or a sudden loss of control mid-session means stopping completely and getting a medical opinion before the next throwing day.
What an Elite Curveball Looks Like
Watch a top-level pitcher’s curveball in slow motion and you’ll see three things: tight, visible rotation, a break that shows up late rather than early, and an arm speed indistinguishable from the fastball. That last detail is the one amateur pitchers miss most often.
Warm-Up Routines That Protect the Elbow and Shoulder
Curveball work asks more of finger and wrist precision than a fastball does, so the warm-up should prioritize forearm, wrist, and shoulder mobility before any throwing begins.
Start with five to seven minutes of general movement, jogging or jumping jacks, to raise core temperature. Cold muscles and tendons don’t stretch the way warm ones do, and skipping this step is one of the easiest ways to invite a strain.
From there, move into dynamic stretches rather than static holds:
- Arm circles, small to large, in both directions
- Cross-body shoulder stretches held for a few seconds each side
- Wrist flexor and extensor stretches, since curveball grip work loads the forearm differently than a fastball does
- Band work for the rotator cuff, focused on external rotation
Follow that with a structured throwing progression: short-distance easy tosses building gradually to full fastball distance before any curveball grip work begins. Skipping straight to curveball reps without a full arm warm-up is one of the more common mistakes among youth pitchers eager to work on the new pitch. The role of warm-up routines in protecting a young arm applies just as much, if not more, to curveball days as it does to regular bullpens.
Budget 10 to 15 minutes for this before any curveball-specific throwing. It’s not wasted time, it’s the difference between a pitcher who can add a new pitch safely and one who develops a nagging ache three weeks in.
Warning Signs That Mean It’s Time to Stop
Arm fatigue shows up differently than most young pitchers expect, and it rarely announces itself as pain first.
The earliest sign is usually a drop in velocity or command that doesn’t match effort. If a pitcher who normally hits the target consistently starts missing high and outside repeatedly, the arm is likely more fatigued than the pitcher realizes or wants to admit.
Watch for these during a session:
- Arm slot dropping lower than usual as the outing goes on
- Increased time between pitches as the pitcher tries to recover
- Visible changes in follow-through, especially a shortened or rushed finish
- Reports of a “dead arm” feeling, even without sharp pain
After throwing, different signals matter:
- Soreness that lasts more than 24 hours or feels worse the next day instead of better
- Numbness or tingling in the fingers or hand
- Any pain localized to the elbow, particularly on the inside
- Reduced range of motion in the shoulder the following day
None of these are things to push through. A pitcher reporting elbow pain specifically, as opposed to general muscle fatigue, needs a break from throwing and a conversation with a medical professional, not a lighter practice the next day. Tracking pitcher recovery patterns over a season makes it much easier to catch these patterns before they become a diagnosed injury rather than after.
A Coach’s Honest Note
Progression beats results every time with this pitch. Fastball command and a trustworthy change-up matter more than any curveball ever will at this age.
Training Tools That Make Curveball Practice Safer
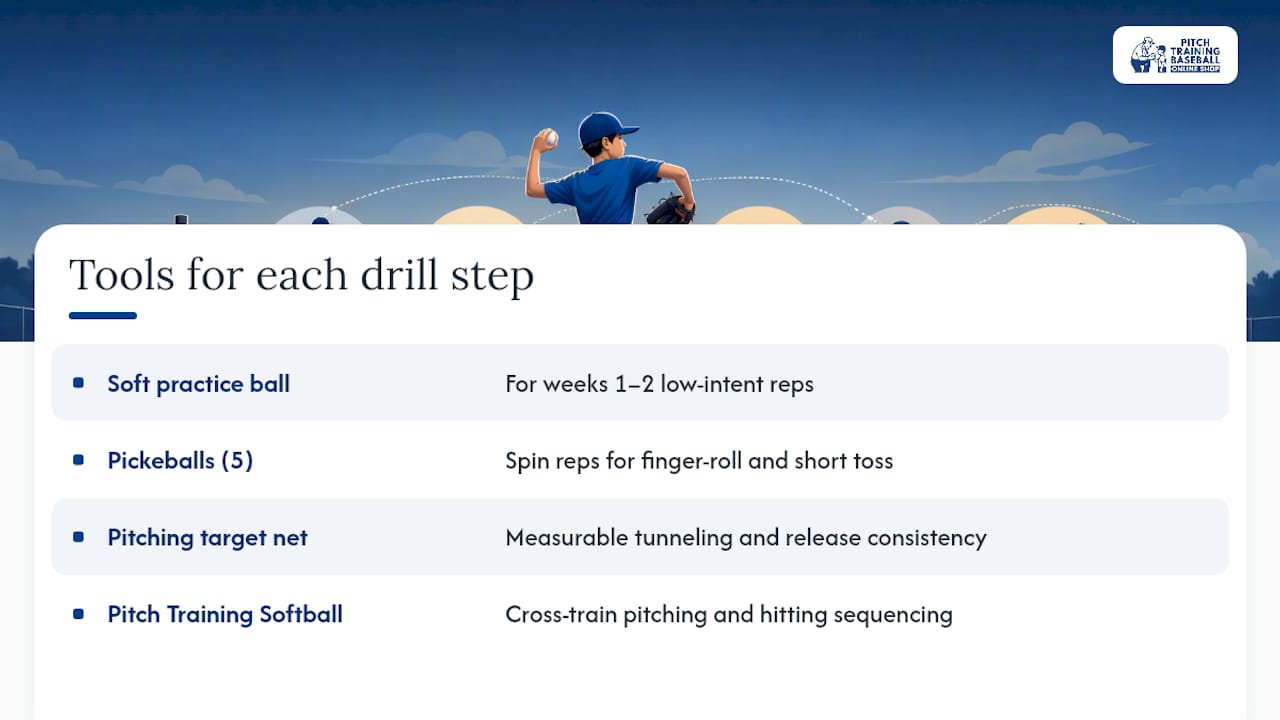
Building a safe curveball takes repetition, and repetition is exactly where the right equipment earns its keep. A soft practice ball takes real arm stress off a young pitcher during the early, low-intent reps described earlier in this guide, which matters most in weeks one and two of any curveball progression, before full mound intent ever enters the picture.

For finger-roll and short-toss drills, 5 Pickeballs give a pitcher a lower-impact way to log extra spin reps without adding wear to a still-developing arm. When it’s time to work on tunneling and release consistency, a Pitching Target Net with Colorful Strike 9-Zone turns the wall or net drill from earlier into something measurable, giving a pitcher a real target to check whether the curveball is landing in the same tunnel as the fastball before it breaks. Pitchers working on both pitching and hitting sequencing can also look at the Pitch Training Softball line for cross-training reps.
Pick one tool that matches whichever drill step from this guide the pitcher is on right now, and add it to the next practice session.
Frequently Asked Questions
What age should a pitcher start to throw a curveball? Pediatric sports-medicine guidance commonly points to around age 14, but physical maturity, strength, and fastball command matter more than the number itself.
Does throwing a curveball hurt a young arm more than a fastball? The evidence is mixed. Some research links curveball use to higher shoulder pain rates in youth pitchers, while biomechanical studies often find fastballs create more torque, which is why pitch counts and mechanics matter as much as pitch selection.
How many curveballs should a young pitcher throw per practice? Early on, 10 to 15 reps focused purely on grip and finger roll, with no mound work, is a reasonable ceiling until spin quality is consistent.
What’s the biggest mechanical mistake pitchers make when learning to throw a curveball? Snapping the wrist late instead of rolling the fingers through release, which usually shows up alongside a dropped elbow and a flatter, less deceptive pitch.
Sources
- Position Statement for Adolescent Baseball Pitchers - American Sports Medicine Institute
- PMC review on pitch types and injury risk
- Pitch Smart pitching guidelines - MLB
- Injury prevention for pitchers - Lurie Children’s
- Prospective cohort study (9–14 yo) on pitch types, pitch counts, and arm pain (AJSM 2002)
Recommended
- How to throw a baseball: proven youth coaching tips – Pitch Training Baseball
- How to improve baseball throwing: techniques and tools – Pitch Training Baseball
- Youth Sports Safety: A Practical Guide for Parents & Coaches – Pitch Training Baseball
- Top pitching workouts for youth baseball: build skill safely – Pitch Training Baseball