


Throwing inaccuracy is one of the most frustrating problems in youth baseball. You can have the strongest arm on the team and still sail throws into the dugout or bounce them three feet short of your target. This throwing accuracy improvement guide covers the mechanics, drills, and mental habits that actually fix the problem, not just mask it. The methods here are built around biomechanical research, age-appropriate training loads, and real-world coaching experience so both players and coaches walk away with tools they can use at the next practice.
Table of Contents
- Key takeaways
- Before you train: prerequisites for throwing accuracy
- Core drills and techniques for youth players
- Fixing the most common throwing errors
- Tracking progress and setting goals that hold
- My honest take after years of watching young arms
- Build better sessions with the right tools
- FAQ
Key takeaways
| Point | Details |
|---|---|
| Grip before mechanics | A correct four-seam grip lays the foundation for every other accuracy improvement you make. |
| Drills over volume | Structured drill plans with short, focused blocks outperform simply throwing more pitches. |
| Track hit rates by age | Target 40% accuracy for 12U players and 60% or higher for high schoolers to set honest benchmarks. |
| Fatigue kills accuracy | Drop in velocity or precision means stop throwing. Rest is part of the training plan, not a break from it. |
| Progress gradually | Only increase target distance or shrink target size after hit-rate stability is confirmed over multiple sessions. |
Before you train: prerequisites for throwing accuracy
Most coaches jump straight into drills. That is a mistake. Before any young player throws a single ball in accuracy training, there are three things that need to be in place: the right grip, a proper warm-up, and a baseline score so you know what you are actually improving.
Getting the grip right
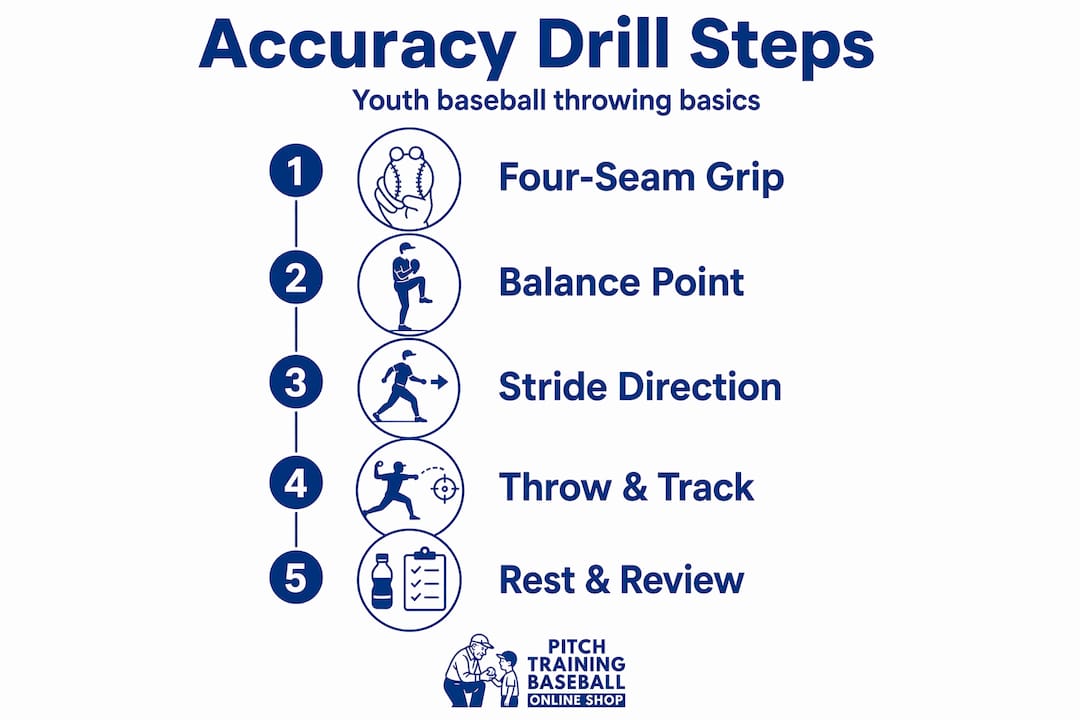
The four-seam grip is the starting point for every throwing accuracy drill in this guide. Place your index and middle fingers across the widest seams of the ball. Your thumb rests underneath. Your ring and pinky fingers tuck lightly on the side for stability. A solid grip affects spin, release angle, and carry, which means proper grip technique directly controls where the ball ends up.
Pro Tip: Have players hold the grip at their side for 30 seconds before each drill session. This builds muscle memory without throwing a single pitch.
Physical and mental prep
A 10-minute warm-up is not optional. Light jogging, arm circles, and band exercises get blood flowing to the rotator cuff before any throwing begins. Mental preparation matters just as much. Players who use pre-throw visualization cues show roughly 18% accuracy improvement over six weeks compared to players who skip that step.
Training tools overview
Having the right equipment makes accuracy drills measurable. Here is what you need to get started:
| Tool | Purpose | Age group |
|---|---|---|
| Four-seam training ball | Grip and spin feedback | All ages |
| Pitching target net with zones | Hit-rate tracking | 8U and up |
| Tape or chalk line on ground | Stride direction feedback | 8U and up |
| Bucket or small target | Distance and spot drill | 10U and up |
| Video device | Arm path review | 12U and up |
Establishing your baseline
Run a Four-Corner Drill on day one. Mark four spots on a wall or net and throw 10 balls at each corner. Record how many you hit. This gives you a real starting number. Without a baseline, you are guessing about progress. Youth pitching performance assessments work the same way. You need a number before you can move it.
Age-appropriate practice volume matters too. For players under 12, accuracy training blocks should stay under 30 total throws per session. For 13 to 15-year-olds, you can push to 40 to 50 throws with rest between sets. Quality is what drives gains, not quantity.
Core drills and techniques for youth players
This is the practical center of any throwing accuracy improvement guide. These drills build the mechanics that make accuracy repeatable under pressure.
The four-corner drill
This is the most direct accuracy training drill you can run. Set up four marked zones on a net or wall representing the four corners of the strike zone. Throw 10 balls per zone. Track how many you hit. Target-based accuracy drills use hit-rate goals by age. A 12U player aiming for 40% is being held to a realistic standard. A high schooler should push toward 60% or better.
Run it this way:
- Start at 30 feet for players 12 and under.
- Throw all 10 reps at one corner before moving to the next.
- Record hits per corner, not just the total.
- Rest for 60 to 90 seconds between corners.
- Review results before the next session and compare to baseline.
Balance point and stride direction drills
These two drills address the mechanical root of most wild throws. Foundational youth pitching mechanics include balance hold and stride direction work as core exercises in an 8 to 10-minute drill block.
For the balance point drill, have the player pause for two seconds at the top of their leg lift before delivering. This teaches body control and weight transfer. If they wobble badly or rush past the point, arm path and release will be inconsistent every time.
For stride direction, put a strip of tape on the ground from the pivot foot pointing straight toward the target. The player’s stride foot should land on or just inside that line. This one cue alone fixes a large percentage of wild throws to the arm side.
Pro Tip: Record a 10-second video from the side during the stride drill. Players who see their own foot landing wide of the tape line correct it far faster than players who are only told about it.
One-knee and rocker throws
These drills isolate specific parts of the throwing motion.
The One-Knee Drill has the player kneel on their back knee, facing the target. From there, they throw using only their upper body and arm path. This removes leg mechanics from the equation and forces focus on arm extension and release point. Research on arm path correction shows that low-volume drills like this, combined with video review, are far more effective than throwing through errors.
The Rocker Throw is a pendulum-style drill where the player rocks back and forward before releasing. It trains rhythm and tempo, two things young players often lose when they overthrow or tense up under pressure.
| Drill | Mechanical focus | Sets per session | Best for |
|---|---|---|---|
| Four-Corner Drill | Spot accuracy and tracking | 4 corners x 10 throws | All youth ages |
| Balance Point Hold | Body control and weight transfer | 3 sets of 5 | 8U to 12U |
| Stride Direction Tape | Foot landing and arm side control | 3 sets of 8 | 10U and up |
| One-Knee Drill | Arm path and release point | 2 sets of 10 | 12U and up |
| Rocker Throw | Rhythm and tempo | 2 sets of 8 | 10U and up |
Adding competitive scoring
Gamifying accuracy practice with clear targets and scoring keeps players far more engaged than repetitive throwing. Set up a point system where each corner hit earns one point. Best score in the group wins a small reward or skips a conditioning drill. Players throw more intentionally when there is something riding on each throw.
Fixing the most common throwing errors
Even with good drills, certain mistakes show up repeatedly. Knowing what to look for and how to fix it saves weeks of frustrating backsliding.
The most frequent errors in youth throwing accuracy are:
- Short-arming: The player shortens their arm path and pushes the ball instead of throwing it. The fix is the One-Knee Drill to encourage full arm extension.
- Glove side flying open: The front shoulder pulls off the target too early, sending throws wide to the throwing side. Coach a “glove squeeze” cue where the player squeezes their glove toward their hip as they rotate. This keeps the front shoulder closed longer and on-line.
- Cross-body throwing: The arm cuts across the body at release instead of extending toward the target. This one usually comes from poor stride direction. Go back to the tape drill.
- Poor follow-through: Stopping the arm early puts stress on the elbow and shoulder while also killing accuracy. The arm should finish on the opposite hip after every throw, every time.
“Fixing throwing errors involves maintaining consistent arm angle, proper footwork, comfortable grips, and balanced follow-through.” — JOI Rehab, Basic Throwing Mechanics
Managing fatigue before it causes problems
Fatigue is a hidden accuracy killer. Velocity and accuracy drops during practice are a clear signal to stop throwing immediately. Pushing through that point does not build toughness. It builds bad habits and injuries. Players who throw more than 100 innings per year face a 3.5 times higher injury risk, and up to 45% of youth players report arm pain during a single season.
Pro Tip: Keep a simple two-column log for every session: throw count in one column, any accuracy or pain notes in the other. Patterns show up fast when you track even three sessions in a row.
Signs that practice should stop:
- Throws becoming noticeably wilder with no mechanical cause
- Player reporting tingling, tightness, or pain in the elbow or shoulder
- Grip strength feeling reduced or arm feeling “heavy”
- Velocity visibly dropping compared to the start of the session
For safe training practices that protect young arms, matching drill intensity to age and rest needs is not negotiable.
Tracking progress and setting goals that hold
Improvement without measurement is just hope. This section gives you the structure to know whether your training is actually working.
Hit-rate benchmarks by age
| Age group | Target hit rate | Distance | Notes |
|---|---|---|---|
| 10U | 30% | 25 to 30 feet | Large target, four zones |
| 12U | 40% accuracy | 30 to 40 feet | Four corners |
| 14U | 50% | 40 to 50 feet | Reduced zone size |
| High school | 60% or higher | 45 to 60 feet | Standard strike zone |
| Elite college | 75% or higher | Standard distance | Full zone targeting |
Only increase distance or shrink the target after a player hits their age-appropriate rate consistently across three or more separate sessions. Jumping ahead too fast resets the player’s confidence and misrepresents their actual progress.
Secondary indicators worth tracking
Beyond hit rate, two other metrics tell you a lot about throwing development:
- Release time consistency: If a player’s release time varies by more than 0.2 seconds between throws in the same drill, something in the mechanics is inconsistent. Video helps here.
- Follow-through completion rate: Count how many of 10 throws include a full arm finish to the opposite hip. Less than 7 out of 10 means the player is habitually cutting throws short.
Enhancing throwing skills over a full season requires planning rest the same way you plan drills. Build in one full rest day after every two throwing sessions. During the off-season, reduce total throwing volume by at least 50% for a minimum of eight weeks to let the arm recover and rebuild.
A growth mindset is not a soft concept here. Players who understand that accuracy is a skill built over months, not days, tolerate the learning curve better and show up to practice with more focus. Set three-week goals, not one-session goals. Celebrate hitting a personal best accuracy rate, not just wins on the scoreboard.
My honest take after years of watching young arms
I have watched a lot of young players throw hundreds of balls a week without improving much, and I have watched others make dramatic accuracy gains with half the volume. The difference is almost never raw talent. It is whether they are training with intention or just going through motions.
The research on professional pitching mechanics makes something very clear. High accuracy pitchers do not throw harder. They show more stable knee flexion and better kinetic sequencing. Accuracy is about repeatability, not power. High-accuracy pitchers showed a center deviation of 14.5% compared to 33.5% for low-accuracy pitchers. That gap is entirely mechanical, not athletic.
In my experience, the coaches who get the best results from their players are the ones who slow everything down. They run 10-minute drill blocks with full attention, not 45-minute throwing sessions with half the focus. They give players the grace to fix one thing at a time rather than overwhelming them with five corrections after a single throw.
I also want to be direct about injury prevention because I think it gets treated like a legal disclaimer instead of a real coaching priority. Load management and rest are not just safety measures. They are accuracy measures. A tired arm does not groove mechanics. It compensates. And compensations turn into habits that take months to undo.
My advice: run shorter sessions, track everything, fix one flaw per week, and rest with the same conviction you practice. That approach builds the kind of accuracy that shows up in games, not just in drills.
— Albert
Build better sessions with the right tools
Drills only work when you have equipment that makes improvement measurable. If your player is throwing at a bucket or a general wall space, you are missing the feedback loop that turns repetition into real progress.
Pitchtrainingbaseball offers a 9-zone pitching target net with a marked strike zone that lets you run Four-Corner and full-zone accuracy drills with instant visual feedback. Pair that with a set of training baseballs designed for grip and mechanical work, and you have everything described in this guide ready to go. These tools are portable, adjustable, and built for the exact age-appropriate sessions coaches and parents are running in backyards, gyms, and practice fields. Every drill in this guide works better when your equipment gives you a clear target and a real score to beat.
FAQ
What is the best drill for throwing accuracy in youth baseball?
The Four-Corner Drill is the most measurable and effective starting point. Players throw at marked zones and track hit rates, which gives coaches and players a concrete benchmark to improve against.
How long should accuracy training drills last for youth players?
Drill sessions of 8 to 10 minutes focused on specific mechanics are more effective than longer, unfocused throwing. Keep total throws under 30 to 40 per session depending on age.
What causes inconsistent throwing accuracy in young players?
The most common causes are short-arming, poor stride direction, and the glove side opening too early. Each of these is a mechanical habit that gets fixed through targeted drills, not by throwing more.
How do I know if a player’s arm needs rest?
If accuracy or velocity drops noticeably mid-session, that is the signal to stop. Players exceeding 100 innings per year face significantly higher injury risk, so tracking total throwing volume across the season is just as important as tracking accuracy.
At what age should accuracy benchmarks start?
You can start tracking accuracy with 10U players using large targets at shorter distances. The realistic benchmark at that age is around 30%. By 12U, a 40% hit rate on a Four-Corner Drill is a solid goal to work toward consistently.
Recommended
- How to improve baseball throwing: techniques and tools – Pitch Training Baseball
- How to throw a baseball: proven youth coaching tips – Pitch Training Baseball
- How to assess youth pitching performance step by step – Pitch Training Baseball
- Top pitching workouts for youth baseball: build skill safely – Pitch Training Baseball