


For youth pitchers, control and command come before velocity. Every time. A 10-year-old who throws with consistent accuracy will outperform a harder thrower who walks multiple batters per inning. Start this week: run a 20-pitch strike-zone targeting drill, three times a week, before any velocity work.
Quick verdict:
- Who: Youth pitchers ages 8–14 should prioritize command over raw speed
- When: Build control first; add velocity work only after a repeatable delivery is established
- Why: At young ages, strike percentage predicts pitching success far more reliably than radar-gun readings
Key Takeaways
Command is the foundation of youth pitching development — build it first, and velocity follows naturally as mechanics and strength improve.
| Point | Details |
|---|---|
| Command before velocity | Youth pitchers should establish a repeatable delivery and consistent strike rate before any velocity-focused training. |
| Different mechanics, different cues | Forearm path and release consistency drive command; leg drive and hip-trunk timing drive velocity — coach them separately. |
| Strike rate is the real metric | Track strike percentage in 20-pitch sequences; a consistent upward trend over 4–6 weeks signals real command development. |
| Avoid forced-effort shortcuts | Max-effort drills before mechanics are groomed raise injury risk and typically reduce command, not improve it. |
| Pitchtrainingbaseball tools | A strike-zone target net and soft training balls support the daily command repetition that drives measurable improvement. |
Table of Contents
- What is control vs velocity in youth pitching?
- Why command matters more than speed for young pitchers
- What biomechanics research tells us about command and velocity
- How to build a safe progression from command to velocity
- Specific drills and a sample weekly practice plan
- Common mistakes and injury risks when chasing velocity
- Simple metrics to track command and velocity progress
- When radar guns, targets, and sensors actually help
- Why I always teach command before velocity
- Pitchtrainingbaseball gear that supports command-first development
- Sources
What is control vs velocity in youth pitching?
Three terms get mixed up constantly on youth fields. Here is what each one actually means:
- Control: The ability to throw the ball into the strike zone consistently. A pitcher with good control throws strikes. That is the baseline.
- Command: A step beyond control. Command means placing the ball exactly where you intend within the zone — low and away, up and in, on the corner. A pitcher with command doesn’t just throw strikes; they choose which strike.
- Velocity: Simply how fast the ball travels, measured in miles per hour.
The practical difference: a pitcher with control gets the ball over the plate. A pitcher with command hits the catcher’s glove on the outer third. Velocity is a separate attribute entirely — you can have great command at 58 mph or terrible command at 72 mph.
As ABCA Magazine coaching commentary puts it, effective pitchers get outs through command, changing speeds, movement, and plane — velocity is one tool among several, not the whole toolbox.
Why command matters more than speed for young pitchers
At the youth level, especially ages 9–12, strike percentage correlates strongly with pitching success. A pitcher who walks batters drives up pitch counts, loads the bases, and puts the defense under pressure — regardless of how hard they throw. High velocity alone tends to be a weak predictor of success at younger ages because fast throwers often struggle with accuracy.
Coaching heuristic: A pitcher who throws 60% strikes in practice will almost always outperform a harder thrower at 45% strikes in a real game.
The game consequences of poor control compound quickly:
- More walks mean more baserunners without a single hit allowed
- Higher pitch counts lead to early exits and overuse risk
- Fielders face more pressure, and errors follow
Little League coaching guidance reinforces this directly: establish repeatable mechanics and command before pursuing added velocity. Simple cues like “push off the rubber” and “finish with a full follow-through” build the foundation that makes command possible.
The TopVelocity development analysis makes an important long-term point: velocity becomes more decisive at higher levels, but command remains the differentiator when pitchers’ speeds converge. Build command now; velocity catches up with physical maturation.
What biomechanics research tells us about command and velocity
The mechanics that produce command and the mechanics that produce velocity are genuinely different. A pilot sensor study published in PMC found that peak forearm linear acceleration was linked to subjective pitch command, while pelvis, trunk, and upper-arm kinematic variables were associated with ball velocity. In plain terms: command lives closer to the hand and forearm; velocity comes from the legs, hips, and trunk firing in sequence.
What this means for practice: Cuing a young pitcher to “snap your wrist” or “stay through the ball” addresses command. Cuing “drive off the rubber” or “rotate your hips first” addresses velocity.
Coach cues mapped to the research:
- For command: consistent release point, forearm path through the zone, staying closed until release
- For velocity: leg drive from the rubber, hip-to-shoulder separation, trunk rotation timing, full arm extension
Trying to fix both in the same session usually fixes neither. Pick one focus per practice block.
How to build a safe progression from command to velocity
Rushing to velocity work before a repeatable delivery is in place is the single most common mistake in youth pitching development. Here is a sequential progression that works:
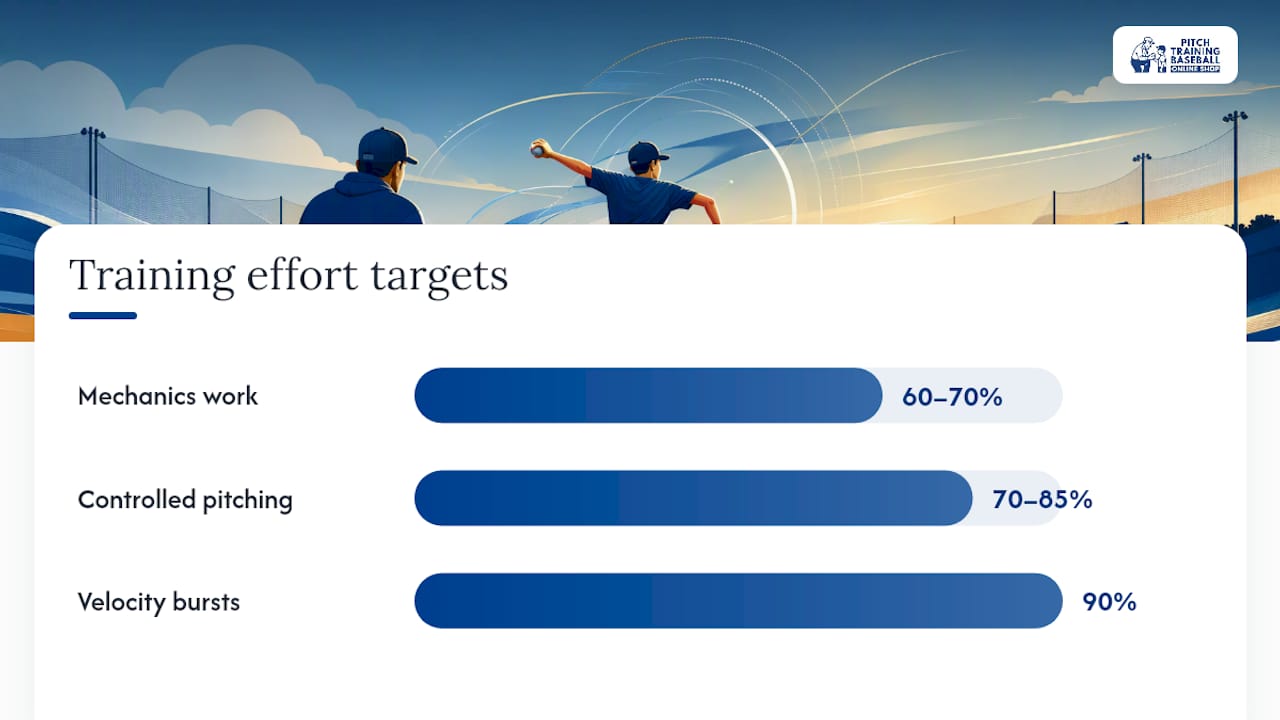
- Establish repeatable mechanics and a target. Pitcher throws to a glove or strike-zone target at 60–70% effort. Goal: consistent arm path and release point, not speed.
- Build strike rate at controlled effort (70–85%). Track strikes in 20-pitch sequences. When a pitcher consistently hits 60%+ strikes across multiple sessions, the delivery is repeatable enough to progress.
- Add strength and mobility work. Age-appropriate hip mobility, core stability, and lower-body strength exercises support the proximal mechanics that drive velocity later. This is not heavy lifting — it is movement quality work.
- Introduce controlled velocity sessions with monitoring. Short bursts at higher effort (90%), followed by rest. Track pitch counts. Never end a velocity session with a fatigued arm.
Checkpoints before moving to the next stage:
- Release point is consistent across at least three consecutive sessions
- Strike rate holds at 60% or better in drill settings
- No arm soreness reported after sessions
Pro Tip: *Never run “throw as hard as you can” drills with youth pitchers. Max-effort throws before mechanics are grooved reinforce bad patterns and raise overuse risk.
Proper warm-up routines before every session are non-negotiable. Cold arms and rushed progressions are where injuries start.
Specific drills and a sample weekly practice plan
Command drills
- Three-zone targeting: Divide the strike zone into inner third, middle, and outer third. Pitcher throws 5 reps to each zone, calling the target before each pitch. Track hit rate.
- Glove-side soft toss: Partner holds glove at a specific location; pitcher focuses on release feel, not speed. Great for forearm path awareness.
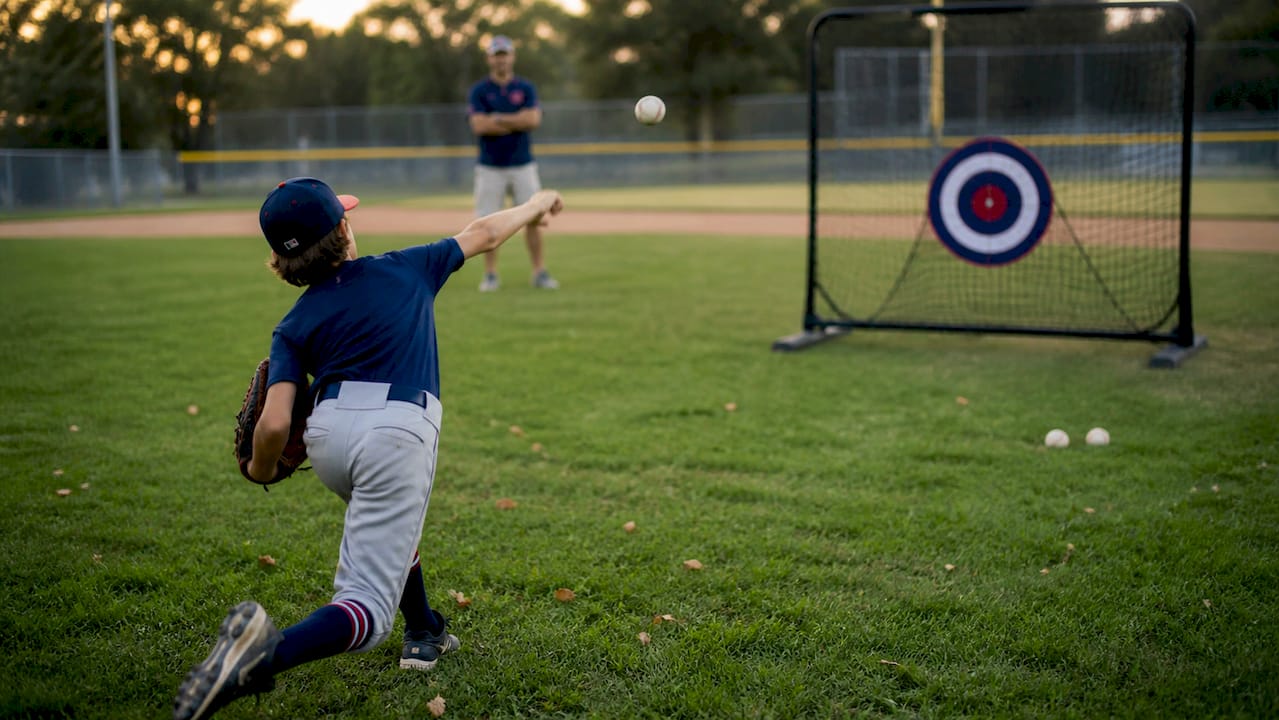
- Bullseye drill: Use a strike-zone target net with marked quadrants. Pitcher calls a quadrant, throws, and logs hits vs. misses over 15 pitches.
Safe velocity drills
- Long-toss progression: Start at 45 feet, extend to comfortable max distance over 3–4 weeks. Focus on arc and arm extension, not max effort.
- Medicine-ball rotational throws: Age-appropriate (light ball, 2–4 lbs) against a wall or to a partner. Trains hip-to-shoulder separation without arm stress.
- 80–90% effort bullpen: Short sessions of 15–20 pitches at controlled high effort. Always follow with rest.
Sample one-week microcycle
Pro Tip: Watch one good drill demonstration video with your pitcher before the session, then put the phone away. Simple verbal cues (“stay closed,” “drive the back leg”) work better than mid-pitch video replays for young players.
Common mistakes and injury risks when chasing velocity
Forced velocity work before mechanics are solid is where most youth arm problems begin. Little League guidance and development-focused coaching analysis both flag the same pattern: shortcuts to speed produce temporary gains and raise injury risk.
Red flags to watch for:
- Abrupt changes in arm path from one session to the next
- Persistent high pitches (often a sign of early trunk rotation or rushing)
- Inconsistent release point across a single bullpen session
- Arm soreness reported after normal-volume sessions
- A drop in strike rate when intensity increases
Forced effort also tends to sacrifice command. When a young pitcher tries to “throw harder,” they often rush the delivery, open the hips too early, and lose the forearm path that drives accuracy.
Injury prevention basics:
- Follow age-appropriate pitch-count limits (USA Baseball’s Pitch Smart guidelines are the practical standard)
- Require at least one full rest day between pitching outings
- Warm up properly — dynamic stretching, light throwing, arm circles before any bullpen work (see safe training practices)
- If a pitcher reports elbow or shoulder pain, stop immediately and consult a sports medicine professional
Pro Tip: Persistent elbow pain in a youth pitcher is never “just soreness.” It warrants a medical evaluation before the next throwing session.
Simple metrics to track command and velocity progress
You do not need expensive equipment to measure progress. These four metrics cover what matters:
- Strike percentage: Count strikes in a 20-pitch sequence. Track across sessions. Improvement looks like a consistent upward trend over 4–6 weeks, not a single good day.
- Quadrant hit rate: In the three-zone or bullseye drill, log hits vs. attempts per zone. A pitcher improving command will show better accuracy on called locations, not just random strikes.
- Peak velocity baseline: Use a radar gun sparingly — once every 2–4 weeks, not every session. Velocity chasing in practice is counterproductive. Use it to establish a baseline and track slow, steady gains.
- Perceived command rating: After each bullpen, ask the pitcher to rate their release consistency on a 1–5 scale. Cross-reference with your own observation. Patterns matter more than single sessions.
Simple practice log:
Fill this in after every session. After four weeks, trends become visible: is strike rate climbing? Is release consistency improving before velocity does? That sequence is exactly what you want to see.
When radar guns, targets, and sensors actually help
Tools add value when they confirm what you already suspect from watching mechanics. They mislead when they replace observation.
Tool checklist:
- Strike-zone target net: The highest-value, lowest-cost tool for command work. Use it every session for location drills. A pitching target gives immediate visual feedback without a catcher.
- Basic radar gun: Useful for velocity baselines every few weeks. Not useful as a session-by-session motivator — it shifts focus from mechanics to speed.
- Wearable sensors (if available): Can monitor arm speed and release timing. Valuable for identifying consistency trends, but correlate sensor data with what you see before changing anything in training.
Pro Tip: If a sensor shows improved arm speed but you’re watching the pitcher’s mechanics deteriorate, trust your eyes. Numbers that don’t match what you see are a signal to investigate, not a reason to celebrate.
Younger players benefit more from command-focused repetition and simple visual targets than from radar-gun competition. Save the velocity focus for later adolescence, when the physical base is there to support it safely.
Why I always teach command before velocity
Every pitcher I have worked with who tried to skip the command phase and chase velocity hit the same wall: inconsistent outings, rising walk totals, and eventually arm fatigue from compensating for poor mechanics with effort. Their mechanics stayed intact because they were never built on force.
One drill that changed how I think about this: a simple 15-pitch bullseye session with a target net, calling each location before throwing. When a pitcher’s hit rate on called locations climbs from 3 out of 15 to 10 out of 15 over six weeks, the walk rate in games drops with it. That is not a coincidence. Command practice produces command results.
Pitchtrainingbaseball gear that supports command-first development
The command-first progression described in this article requires one thing above everything else: repetition with a target. That is exactly what Pitchtrainingbaseball’s training equipment is built for.

The Pitch Training Softball strike-zone target net gives pitchers an immediate visual feedback loop on every throw — no catcher required, no guessing whether the pitch was a strike. Pair it with 5 Pickeballs, the soft training balls designed for high-rep command work at home or on the field, and you have everything needed to run the three-zone drill, the bullseye drill, and controlled velocity sessions safely. Both products are youth-appropriate, portable, and built for the kind of daily repetition that actually moves the needle on strike rate. Browse the full lineup at Pitchtrainingbaseball and get your pitcher started on the right progression this week.
Sources
- Using sensors for player development: assessing biomechanical factors related to pitch command and velocity
- Coaching Young Pitchers in Baseball – Keep It Simple - Little League
- Coach Your Kids: Pitch, Not Throw - ABCA Magazine
- Pitching Velocity VS Command - TopVelocity
Recommended
- What Is Pitch Command? A Guide for Youth Baseball – Pitch Training Baseball
- Defining Youth Pitching Mechanics: A Coach’s Guide – Pitch Training Baseball
- Pitching zone knowledge: Boost your young player’s skills – Pitch Training Baseball
- Pitching Trends in 2026: What Coaches Must Know – Pitch Training Baseball