


Medicine ball workouts are one of the most effective, low-arm-stress tools for building the rotational power young pitchers need. Start here: pick a 2–4 lb ball for players 12 and under, a 4–6 lb ball for teens 13 and older, and treat your first four sessions as technique work, not power work. Before any session, run a quick pain check: if a pitcher reports elbow or shoulder soreness from recent throwing, skip the med-ball work that day.
Three immediate action items for coaches and parents:
- Choose the right weight. Age-appropriate ball weights start at 2–4 lb for younger youth and 4–6 lb for mature teens. Heavier is not better when technique breaks down.
- Set the session intent. Activation sessions (pre-game, 8–12 throws) differ from power development sessions (3–4 sets of 6–8 throws). Mixing them up wastes both.
- Run the safety check. Med-ball work is a complement to throwing, not a replacement. Youth rest rules still apply: mandatory days off each week and months off from competitive pitching each year.
The science backs this up. Research published in the Journal of Strength and Conditioning Research found that rotational medicine-ball throw velocity correlates with pitching velocity (r ≈ 0.62), explaining roughly 38% of the variance in pitching speed in a college sample. That is a meaningful transfer signal, not a coincidence.
Table of Contents
- Why medicine-ball training helps pitchers develop real power
- 10 medicine ball drills for pitchers, with cues and reps
- What weight and how many throws per session
- Three ready-to-use workouts and a 6–8 week progression block
- Safety rules every coach and parent needs to follow
- Key Takeaways
- Why coaches underestimate what med-ball work actually teaches
- Pitchtrainingbaseball has the youth-safe gear to run these drills
- Useful sources and further reading
Why medicine-ball training helps pitchers develop real power
Pitching velocity comes from the kinetic chain: ground force travels through the legs, into the hips, through the trunk, and finally out the arm. Med-ball throws train exactly that sequence. A rotational throw forces the hips to fire first, the trunk to follow, and the arm to deliver last. Get that order wrong and the ball lands short. Get it right and the pitcher feels what proper sequencing actually means in their body, not just on a whiteboard.
This is where med balls differ from weighted baseballs. Weighted-ball programs can increase velocity but also raise injury risk when not properly progressed, partly because they add eccentric load directly to the arm. Med balls are larger, designed for ballistic throws where the athlete releases and does not catch the ball back. That no-catch design removes most of the eccentric stress on the shoulder and elbow, which is why med-ball drills cause minimal next-day soreness and can be used more frequently during the season.
Med-ball throws also work well as post-activation potentiation (PAP) drills before a bullpen or game. A short set of high-intent rotational throws primes the kinetic chain, wakes up the hip rotators and trunk stabilizers, and improves sequencing without fatiguing the arm.
Research signal: A J Strength Cond Res study found rotational med-ball throw velocity correlates meaningfully with pitching velocity. That is a stronger transfer signal than most single-joint exercises produce.
One caution worth stating plainly: med-ball volume counts as throwing volume for a young pitcher’s arm. Overuse is the primary injury driver in youth baseball, so total workload, including med-ball throws, must be tracked alongside pitch counts.
10 medicine ball drills for pitchers, with cues and reps
1. Rotational scoop toss
What it trains: Hip-to-trunk sequencing, rotational power transfer.
Stand sideways to a wall or partner, feet shoulder-width apart. Load into the back hip, then drive the hips toward the target and let the trunk follow. Release the ball at hip height in a scooping arc. The hips should move before the shoulders, every rep.
Reps/sets: 6–8 reps per side, 2–3 sets. Youth 12 and under: 2 sets of 6. Common error: Rotating hips and shoulders together as one unit. Cue: “Fire your hip, then your chest.”
2. Rotational shot-put throw
What it trains: Arm-side power and upper-body drive off a stable lower half.
Hold the ball at shoulder height on the throwing side, elbow up. Drive off the back foot, rotate through the hips, and push the ball forward like a shot-put. The lead leg should brace and block at release.
Reps/sets: 6–8 reps per side, 2–3 sets. Common error: Collapsing the lead knee instead of blocking. Cue: “Stick your front leg like a post.”
3. Side throw (wall or partner)
What it trains: Full rotational power, hip-shoulder separation.
Stand perpendicular to a rebounder wall, 4–6 feet away. Load the back hip, then explode through the hips and chest, throwing the ball hard into the wall. Catch the rebound and reset. This is the closest analog to the pitching motion in the med-ball drill bank.
Reps/sets: 8–10 reps per side, 2–3 sets. Common error: Throwing with the arms only. Cue: “The ball goes where your belly button points.”
4. Kneeling rotational throw
What it trains: Trunk rotation without lower-body compensation, isolates core sequencing.
Kneel on both knees facing a wall or partner. Hold the ball at chest height, rotate back, and throw using only the trunk. No hip drive here. This drill exposes how much rotation a pitcher actually generates from the core alone.
Reps/sets: 6–8 reps per side, 2 sets. Good starting point for beginners. Common error: Leaning back instead of rotating. Cue: “Stay tall, turn your chest.”
5. Half-kneeling rotational throw
What it trains: Hip-shoulder separation with a stable base, bridges kneeling and standing throws.
Drop to a half-kneeling position with the throwing-side knee down. Load the ball back, then rotate through the trunk and drive the throw. The down knee prevents lower-body cheating and forces the trunk to do the work.
Reps/sets: 6–8 reps per side, 2–3 sets. Common error: Letting the front knee cave inward. Cue: “Push your front knee out over your toe.”
6. Overhead slam
What it trains: Trunk flexion, lat engagement, deceleration awareness.
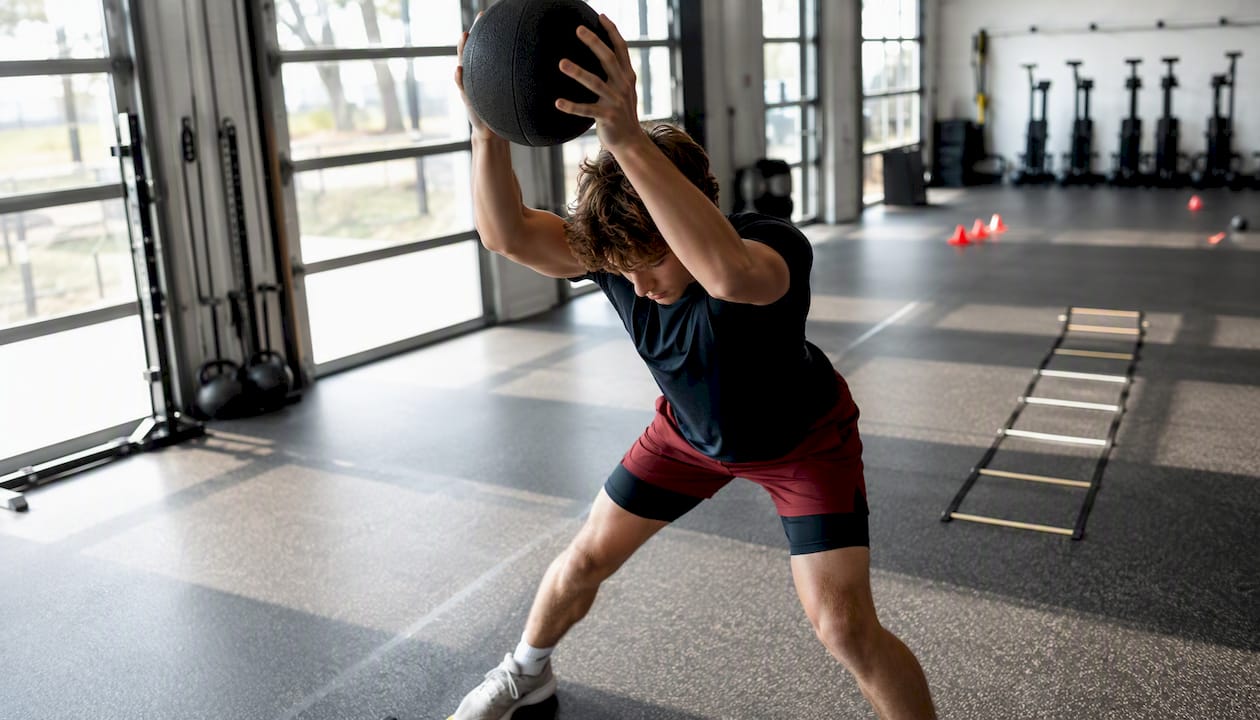
Hold the ball overhead with both hands, feet shoulder-width apart. Engage the core, then slam the ball straight down into the ground as hard as possible. This builds the lat and trunk strength that supports arm deceleration after ball release.
Reps/sets: 6–8 reps, 2 sets. Use a lighter ball (2–4 lb) for youth. Common error: Arching the lower back at the top. Cue: “Brace your belly before you slam.” Caution: Avoid this drill if a pitcher has active shoulder pain.
7. Chest pass (power)
What it trains: Anterior chain power, upper-body explosiveness.
Stand facing a wall or partner, feet staggered. Hold the ball at chest height and drive it forward with both hands as hard as possible. Focus on a quick, explosive release, not a slow push.
Reps/sets: 8–10 reps, 2–3 sets. Common error: Slow, muscled push instead of an explosive snap. Cue: “Punch it, don’t push it.”
8. Step-behind rotational throw
What it trains: Momentum transfer, full-body rotational sequencing.
Start facing away from the target. Step the back foot behind the front (crossover step), load into the hip, then unwind and throw. This drill teaches pitchers to use momentum and hip rotation together, similar to the stride-and-rotate sequence in a full delivery.
Reps/sets: 6–8 reps per side, 2–3 sets. Best for intermediate and older athletes. Common error: Rushing the step and losing the load. Cue: “Step, pause, then explode.”
9. Anti-rotation chop (with med ball)
What it trains: Rotational stability, core bracing, resisting unwanted trunk movement.
Stand sideways to a wall, holding the ball with both hands at shoulder height. Slowly lower the ball across the body in a diagonal chop pattern while resisting rotation. The goal is controlled deceleration, not speed.
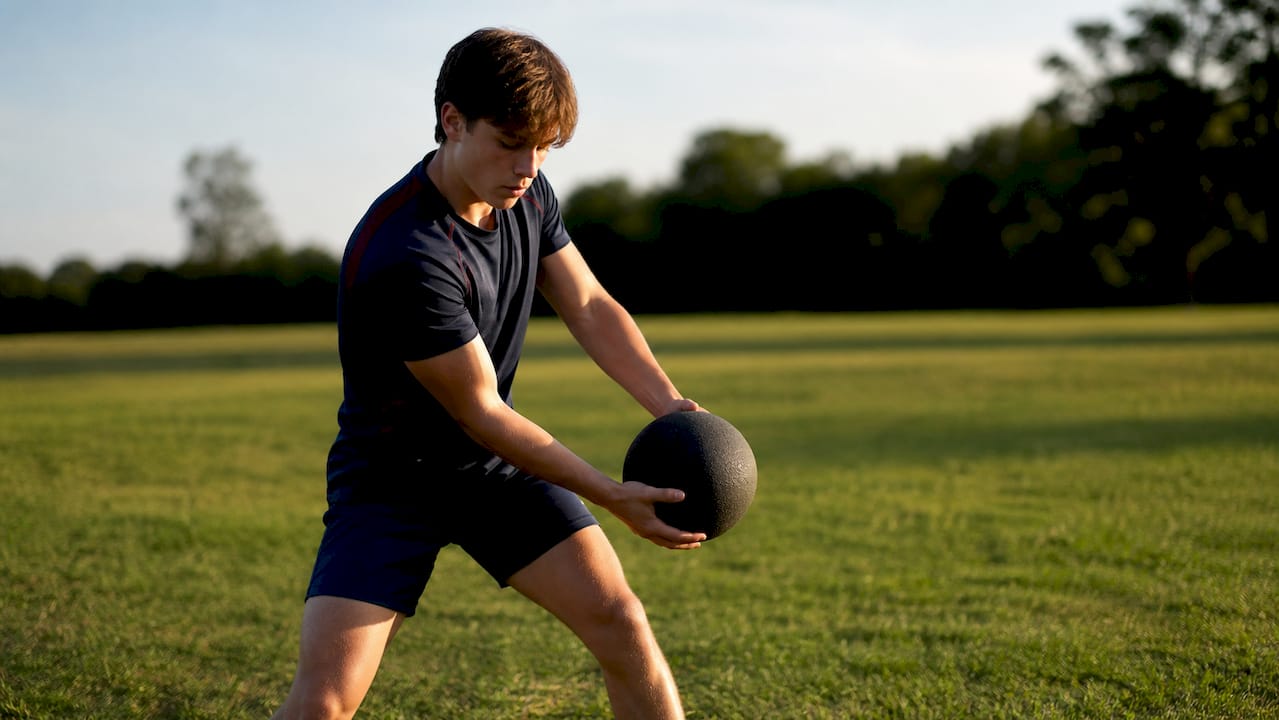
Reps/sets: 8–10 reps per side, 2 sets. Works well as a warm-up or cool-down drill. Common error: Letting the hips rotate with the arms. Cue: “Hips stay square, only the arms move.”
10. Drop-step rotational throw
What it trains: Explosive hip loading, full kinetic-chain sequencing from a dynamic start.
Begin standing, then drop-step the back foot to create hip loading, and immediately unwind into a full rotational throw. This is the most advanced drill in the group and requires solid technique in drills 1–3 before attempting it.
Reps/sets: 6–8 reps per side, 2–3 sets. Intermediate to advanced athletes only. Common error: Skipping the load phase and going straight to the throw. Cue: “Drop and load before you go.”
Pro Tip: The single biggest sequencing upgrade for most youth pitchers is learning to separate hips and shoulders. Before adding speed or load, have the athlete perform a slow kneeling throw and ask them to feel the hips rotate first. Once they can describe that sensation, they are ready to add speed.
What weight and how many throws per session
Coaching consensus recommends starting light and building movement quality before adding weight, with increasing load and volume appropriate to age and experience.
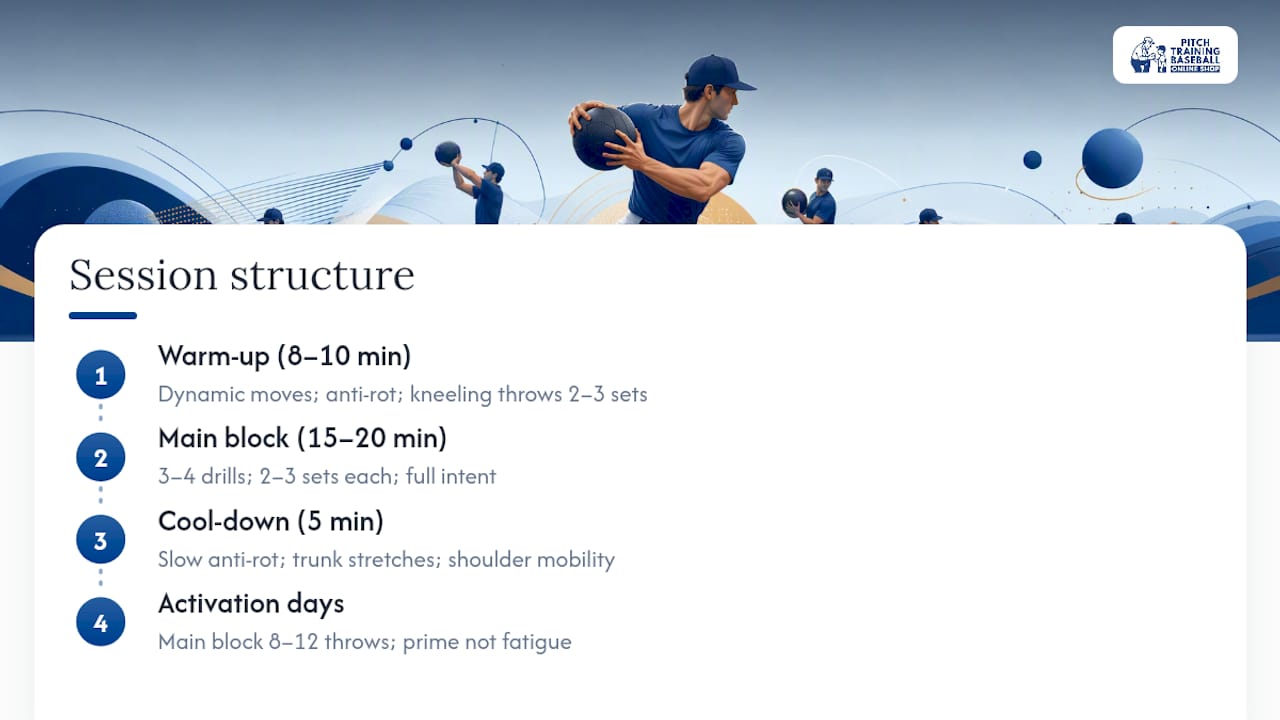
Session structure template:
Warm-up (8–10 min): Dynamic movement (leg swings, hip circles, arm circles), light anti-rotation chops, 2–3 sets of kneeling throws at 50% effort. For a full warm-up framework, the role of warm-up exercises for youth pitchers is worth reviewing.
Main block (15–20 min): 3–4 drills from the list above, 2–3 sets each, full intent on every throw.
Cool-down (5 min): Slow anti-rotation chops, trunk stretches, shoulder mobility work.
On activation days (pre-game or pre-bullpen), cut the main block to 8–12 total throws at full intent. The goal is priming, not fatigue. Plyometric principles behind this approach are explained well in this guide to plyometric exercises for athletes.
Three ready-to-use workouts and a 6–8 week progression block
Workout 1: Beginner (technique focus)
- Kneeling rotational throw: 2 sets × 6 reps per side (2 lb ball)
- Anti-rotation chop: 2 sets × 8 reps per side
- Chest pass: 2 sets × 8 reps
- Overhead slam: 2 sets × 6 reps (2 lb ball)
Total throws: approximately 20–25. Rest 60–90 seconds between sets.
Workout 2: Intermediate (power and coordination)
- Side throw (wall): 3 sets × 8 reps per side
- Rotational scoop toss: 3 sets × 8 reps per side
- Half-kneeling rotational throw: 2 sets × 8 reps per side
- Step-behind rotational throw: 2 sets × 6 reps per side
- Overhead slam: 2 sets × 8 reps
Total throws: approximately 50–60. Rest 90 seconds between sets.
Workout 3: PAP/pre-game activation
- Rotational scoop toss: 2 sets × 4 reps per side (full intent)
- Side throw: 1 set × 4 reps per side (full intent)
Total throws: 12–16. Done 10–15 minutes before throwing. This is the PAP approach that primes the kinetic chain without fatiguing the arm.
6–8 week progression block
Structured 6–8 week blocks with planned recovery are the standard framework for adding med-ball work safely. Here is a sample outline:
| Week | Focus | Volume | Notes |
|---|---|---|---|
| 1–2 | Movement quality | Low (20 throws/session) | Technique only, light weight |
| 3–4 | Speed and intent | Moderate (50 throws/session) | Add side throws and step-behinds |
| 5–6 | Load and complexity | Moderate-high (60 throws/session) | Increase weight by 1–2 lb if form holds |
| 7 | Deload | Low (15–20 throws/session) | Reduce volume significantly, maintain intent |
| 8 | Test and reset | Moderate | Re-test RMBT distance, assess readiness |
Example weekly schedule (in-season):
- Monday: Rest or light arm care
- Tuesday: Med-ball power session (Workout 2)
- Wednesday: Bullpen or throwing day (no heavy med-ball)
- Thursday: Light activation or rest
- Friday: PAP activation (Workout 3) + game
- Saturday: Game or rest
- Sunday: Full rest
Off-season: two med-ball sessions per week is appropriate. In-season: one power session plus one activation session per week. For a broader look at how to build arm strength training for young pitchers, the programming principles align closely with this block structure. Periodization principles that support this approach are covered in this training periodization guide for athletes.
Safety rules every coach and parent needs to follow
Overuse is the primary injury driver in youth baseball, and adding med-ball volume on top of a heavy throwing schedule compounds that risk. Sports-medicine guidance is clear: youth pitchers need mandatory rest days each week and months off from competitive pitching each year. Med-ball throws count toward total arm workload, even though they stress the arm less than weighted baseballs.
Safety signal: Youth arm-care programs that include stretching and strengthening have been shown to reduce medial elbow injury incidence in young throwers. Med-ball work fits within that framework when volume is managed.
Red flags: stop med-ball work immediately if a pitcher reports:
- Elbow or shoulder pain during or after throws
- Numbness or tingling in the arm or hand
- A sudden drop in throw distance or velocity without an obvious cause
- Pain that persists more than 24 hours after a session
The decision flow is simple: pain → stop → rest → medical evaluation before returning. Do not push through arm pain with any throwing-related activity.
Dos and don’ts for scheduling:
- Do use activation throws (Workout 3) on game days, 10–15 minutes before pitching.
- Do place power sessions on non-throwing days or light-throwing days.
- Don’t run a heavy med-ball session the day before or after a high-pitch-count outing.
- Don’t increase both ball weight and throw volume in the same week.
For practical rest and pitch-count guidance, recommended pitching rest strategies for youth players lays out the specifics coaches should follow. Pairing med-ball work with a solid youth injury prevention approach keeps the whole program sustainable.
Key Takeaways
Medicine-ball training builds rotational power and kinetic-chain sequencing in pitchers when ball weight, volume, and session intent are matched to the athlete’s age and training phase.
| Point | Details |
|---|---|
| Start light, prioritize technique | Use 2–4 lb for youth 12 and under; movement quality before power, every time. |
| Med-ball throws transfer to velocity | A correlation of r ≈ 0.62 links rotational throw velocity to pitching velocity in research. |
| Structure in 6–8 week blocks | Progress from movement quality to speed to load, with a deload week at week 7. |
| Safety rules still apply | Youth rest days and months off per year are non-negotiable; med-ball volume counts toward total arm workload. |
| Pitchtrainingbaseball gear fits this program | Youth-safe training tools from Pitchtrainingbaseball support the drills and progressions in this article. |
Why coaches underestimate what med-ball work actually teaches
Most coaches add med-ball throws to a program for one reason: velocity. That is a reasonable goal, but it misses the more durable benefit. What med-ball work actually teaches, when done well, is body awareness. A pitcher who has done 200 kneeling rotational throws knows what hip-first sequencing feels like. That kinesthetic map does not disappear when the med ball goes back in the bag.
The mistake is treating med-ball sessions as a conditioning add-on rather than a skill-development tool. When coaches rush to heavier balls and higher volumes, they get fatigue, not learning. A 10-year-old throwing a 6 lb ball with poor form is not building power. They are reinforcing a compensation pattern that will show up in their delivery.
The other thing coaches miss: med-ball distance is a free monitoring tool. Run a standardized rotational throw test at the start of each week, same ball, same distance, same setup. If a pitcher’s distance drops noticeably without a change in effort, that is a fatigue signal worth acting on before it becomes a pain signal. No extra throwing required, no velocity gun needed.
Parents can support this by tracking one simple thing: consistency. A pitcher who throws the same distance session after session is recovering well and adapting. One whose numbers bounce around is probably not sleeping or eating enough, or the training load is too high. That is a conversation worth having early.
Pitchtrainingbaseball has the youth-safe gear to run these drills
Young pitchers need equipment built for their size, strength, and stage of development. Pitchtrainingbaseball offers training tools designed specifically for youth athletes: lightweight training balls, strike zone target nets, and practice gear that holds up to daily use at home, in the backyard, or at the field.

The Pitch Training Baseball product line gives coaches and parents a practical starting point without overcomplicating the setup. Pair training balls with the Pitching Target Net with Colorful Strike 9-Zone to add accuracy work alongside the rotational drills in this article. Both products are designed for youth safety and easy portability.
This article is educational and does not constitute medical advice. If a pitcher reports arm pain, consult a sports-medicine provider before continuing any throwing or med-ball program.
Useful sources and further reading
The claims in this article are backed by peer-reviewed research, sports-medicine guidance, and coaching practitioner resources. If a pitcher experiences pain, stop all throwing activity and consult a sports-medicine physician or athletic trainer before resuming.
- How to avoid injuries in youth baseball — Cedars-Sinai
- Medicine ball PAP and kinetic-chain priming — UTA thesis
- Rotational medicine ball throw velocity relates to pitching velocity — PubMed (J Strength Cond Res)
- Review of weighted baseball programs and injury risk — PMC
- How to manage a year-around throwing/pitching program for amateur athletes — PBSCCS
- Medicine ball exercises for pitchers — TeamMSTRD
- The Youth Throwers Ten exercise program — IJSPT