


A slider is a breaking pitch that breaks late and diagonally toward the pitcher’s glove side, driven by off-center spin rather than pure topspin. According to the MLB glossary, it travels faster than a curveball with less overall movement but a sharper, later break. In practical terms, coaching resources consistently place sliders 5–10 MPH below a pitcher’s fastball, with the deception coming from how late that break arrives, not how far the ball moves.
Key Takeaways
A slider’s effectiveness comes from late, arm-side break driven by off-center spin, not from overall movement, and developing it safely requires age-appropriate progressions and consistent measurement.
| Point | Details |
|---|---|
| Slider movement defined | Late, diagonal glove-side break from off-center spin, typically 5–10 MPH below fastball velocity. |
| Profile differences matter | Sweepers average ~15 inches of horizontal break; traditional sliders average — inches. |
| Spin axis drives direction | A 2:00–3:00 axis produces horizontal break; tilting toward 4:00–5:00 adds vertical drop. |
| Age and safety first | Delay regular slider training until around age 14 to protect the medial elbow and UCL. |
| Pitchtrainingbaseball tools | Strike-zone target nets and soft training balls support the full grip-to-bullpen slider progression safely. |
Table of Contents
- What does slider pitch movement actually look like?
- How spin and the Magnus effect create slider movement
- How to grip and release a slider
- How coaches measure and track slider movement
- Why sliders are so hard to hit
- Slider profiles you can study on film
- Safe coaching progressions and drills for developing slider movement
- An honest take on slider development timelines
- Build slider control with the right training tools
- Sources
What does slider pitch movement actually look like?
Sliders are not one pitch. Four distinct profiles exist, each with a different movement signature.
Traditional slider: The classic version breaks sharply and late, mostly glove-side with modest vertical drop. Horizontal movement typically runs modestly below the sweeper’s range. Velocity sits 5–10 MPH below the fastball, and spin rate generally falls in the 2,200–2,600 RPM range.
Sweeper: Built on side-spin, the sweeper trades late sharpness for wide, horizontal sweep. MLB data shows sweepers have significantly wider horizontal break than traditional sliders, more than double a traditional slider. Velocity is somewhat lower than a standard slider, and the pitch stays flatter vertically.
Gyro-slider: Spin axis tilts toward the pitcher, producing a bullet-like spiral with minimal Magnus-effect deflection. The result is a pitch that looks like a fastball until it drops late with little horizontal sweep. Hitters read it as a fastball and swing over it.
Slurve: Sits between a slider and a curveball, with more vertical drop than a traditional slider and a rounder, loopier break. The MLB glossary classifies it as a distinct pitch profile, not simply a poorly thrown slider.
Visual cues scouts use to identify each profile:
- Traditional slider: tight dot on the ball as it approaches, sharp late glove-side kick
- Sweeper: wide arc visible from the first third of flight, stays elevated longer
- Gyro-slider: looks like a four-seam fastball until the last 10–15 feet, then drops
- Slurve: visible loop from release, slower arm speed than a slider
How spin and the Magnus effect create slider movement
The physics behind slider movement come down to two variables: spin rate and spin axis.
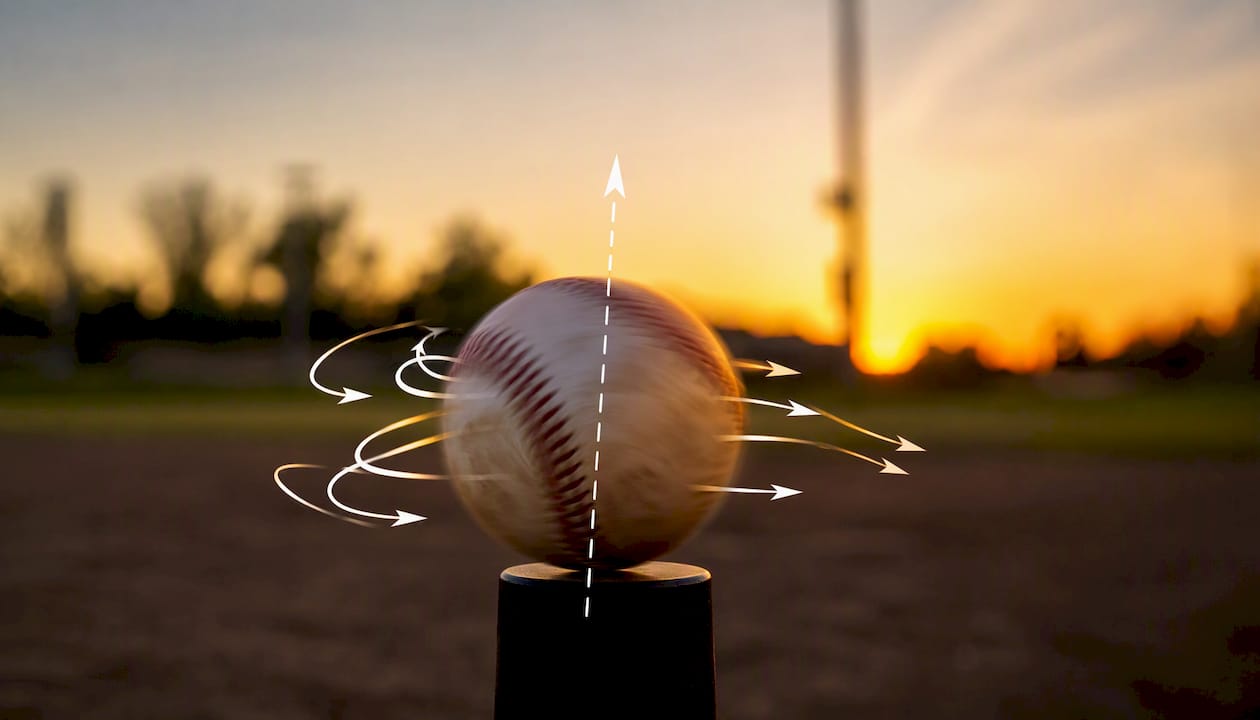
Spin rate (measured in RPM) determines how much force the Magnus effect generates. The Magnus effect is the aerodynamic lift or deflection that occurs when a spinning ball pushes air to one side, creating a pressure difference that bends the ball’s path. Higher RPM means more deflection, all else equal.
Spin axis determines the direction of that deflection. Wikipedia’s breakdown of pitch mechanics explains) that a pure side-spin axis (roughly 3 o’clock for a right-handed pitcher) produces maximum horizontal movement with minimal vertical component. Tilt the axis toward 4 or 5 o’clock and you add vertical drop, which is how a slurve gets its shape. Tilt toward 12 o’clock and you approach curveball territory.
Seam orientation matters more than most coaches acknowledge. When the seams cut through the air at a specific angle, they create turbulence that amplifies or dampens the Magnus effect. Research into slider micro-physics shows that small changes in finger pressure and seam contact shift the spin axis by several degrees, which translates to measurable changes in where the pitch ends up at the plate.
Gyro spin is the exception. When the spin axis points directly at the catcher (like a bullet or a football spiral), the Magnus effect is nearly zero. The pitch gets no aerodynamic deflection, so it drops from gravity alone and arrives later than expected.
Pro Tip: When reading spin-axis data from a sensor, prioritize axis consistency over raw RPM. A pitcher who throws 2,300 RPM with a stable 2:30 axis every rep will produce more predictable movement than one who averages 2,500 RPM but varies between 2:00 and 3:30.
How to grip and release a slider
The grip is where slider mechanics begin, and the feel should be noticeably off-center compared to a four-seam fastball. If the grip feels identical to your fastball, the fingers are too centered and you will need to force wrist manipulation to get side-spin, which is both less effective and harder on the elbow.
Standard slider grip (right-handed pitcher):
- Place the index and middle fingers together on the outer third of the ball, with the middle finger resting along or just outside the right seam.
- The thumb sits underneath, slightly toward the index-finger side.
- The ring finger and pinky curl loosely against the side of the ball for stability.
- Grip pressure concentrates on the middle finger, not the index.
For a sweeper, slide the fingers further toward the outside of the ball and flatten the wrist slightly at release. For a gyro-slider, keep the fingers on top and release with a pronation-forward motion, similar to a football throw.
Release mechanics: The arm path stays on the same plane as your fastball. The difference happens at the very end: instead of driving through the center of the ball, the middle finger cuts across the outer edge, imparting side-spin. The wrist does not snap or twist aggressively. Think of it as “cutting” the ball rather than throwing it.
Numbered progression drills:
- Grip reps off the mound: hold the grip for 30 seconds, release into a towel or net, feel where pressure sits.
- Flat-ground release drill: throw at 50% effort to a partner at 45 feet, focusing only on the cut feel at release.
- Spin-check drill: throw against a rebounder or net and watch the ball’s rotation in slow motion on video.
- Bullpen reps with a target: throw 10–15 sliders per session at a strike-zone target, tracking location and spin.
Common faults to fix:
- Turning the wrist over (supination): produces a hanging slider with no late break
- Gripping too deep in the palm: kills spin rate and flattens movement
- Changing arm speed: tipping the pitch to hitters and reducing deception
- Rushing the release: the cut happens at the end, not mid-delivery
Pro Tip: Film your release from behind the mound at 240 fps if your phone allows it. A correct slider release shows the ball leaving off the middle finger with a visible cut; a faulty one shows the ball rolling off the fingertips like a fastball.
How coaches measure and track slider movement
Measurement turns guesswork into a coaching conversation. Four metrics define slider quality.
RPM (spin rate): Total revolutions per minute. Higher RPM generally means more Magnus-effect deflection, but only if the axis is correct.
Spin axis (degrees): Expressed as a clock position (e.g., 2:30 for a right-handed slider). Determines the direction of movement.
Horizontal break (inches): How far the pitch moves side-to-side relative to a spin-free trajectory. The key number for sweeper vs. traditional slider classification.
Vertical break (inches): How much the pitch rises or drops relative to a spin-free trajectory. Negative values mean the pitch drops more than gravity alone.
Extension (feet): How far in front of the rubber the ball is released. More extension shortens the hitter’s reaction time.
Measurement tools:
- TrackMan: Doppler radar; captures velocity, spin rate, axis, and full trajectory. Standard at the MLB and NCAA levels.
- Rapsodo: Optical/radar hybrid; more affordable, widely used in high school and travel ball programs. Reports spin rate, axis, and break in real time.
- Statcast: MLB’s in-stadium system; the source for the movement figures you see on broadcast graphics.
Quick interpretation guide:
- Low RPM with correct axis: increase finger pressure on the middle finger and check grip depth
- Correct RPM but wrong axis: adjust seam orientation under the fingers and check wrist position at release
- Inconsistent horizontal break: grip pressure is varying rep-to-rep; slow down and do grip-only reps
- Late break is missing: arm speed may be dropping; match fastball arm speed through release
Why sliders are so hard to hit
The slider’s effectiveness is not about raw movement. It is about when the movement happens and how it relates to the fastball.
A hitter commits to a swing decision roughly 150–175 milliseconds after the ball leaves the pitcher’s hand. A well-thrown slider travels on a fastball-like plane for the first two-thirds of its flight, then breaks sharply in the final 10–15 feet. By the time the break is visible, the hitter’s decision is already locked in.
This is the tunneling principle. When a slider and a fastball share the same initial flight path (the “tunnel” through the first 20–25 feet), the hitter cannot distinguish them early enough to adjust. The slider then deviates, arriving at a different location than the hitter’s brain predicted. The result is either a swing-and-miss or weak contact on the end of the bat.
Situational uses where sliders produce the best results:
- 0–2 and 1–2 counts: throw the slider off the plate, glove side, to chase
- Ahead in the count against pull-heavy hitters: back-foot slider to right-handed hitters from a right-handed pitcher jams the hands
- Following a high fastball: the fastball elevates the hitter’s eye, the slider drops below the zone
- Two-strike situations against contact hitters: slider at the knees generates weak grounders
Pro Tip: Set up the slider with a fastball in the same location first. A slider that arrives where a fastball just was is far more effective than a slider thrown to a location the hitter has not seen. Sequence, not just movement, is what makes the pitch work.
Slider profiles you can study on film
Watching sliders on video teaches you things no diagram can. Here is what to look for across the main profile types.
A high-velocity traditional slider from a power arm typically shows a tight spin dot visible from center-field camera angles. The break is short and late, with velocity noticeably below the fastball, giving the hitter limited reaction time. Freeze-frame the last 10 feet of flight and you will see the ball kick sharply toward the glove side.
A low-trajectory sweeper from a three-quarter arm slot looks almost flat for the first half of its flight, then sweeps 12–15 inches across the zone. From the batter’s perspective, it starts at the hip and ends at the opposite knee. On film, watch the seam orientation at release: the ball often shows a visible tilt before the spin takes over.
What to track when watching film:
- Release point: does it match the fastball release? If not, the pitcher is tipping
- Spin axis: use slow-motion to identify the dot or spiral pattern on the ball
- Break point: mark the frame where the ball visibly deviates from its initial path
- Arm speed: consistent arm speed through release is the sign of a well-disguised slider
For annotating clips, tools like Hudl or Coach’s Eye let you draw trajectory lines and mark the break point frame-by-frame. Pair that with Rapsodo data and you have a complete picture of what the pitch is doing and why.
Safe coaching progressions and drills for developing slider movement
Teaching a slider responsibly means sequencing the work correctly and knowing when to stop.
BattingLeadoff recommends waiting until around age 14 before introducing regular slider training. The medial elbow and UCL face increased valgus stress from the slider’s cutting motion, and growth plates in younger athletes are not yet equipped to handle that load consistently. Before age 14, focus on fastball mechanics, changeup development, and arm strength.
Safe progression for introducing sliders:
- Mechanics check: confirm the pitcher has sound fastball mechanics and no existing elbow or shoulder complaints before touching slider work.
- Grip-only phase (2–3 weeks): practice the grip off the mound, throw into a net or soft training balls at reduced effort, and focus entirely on the feel of the cut at release.
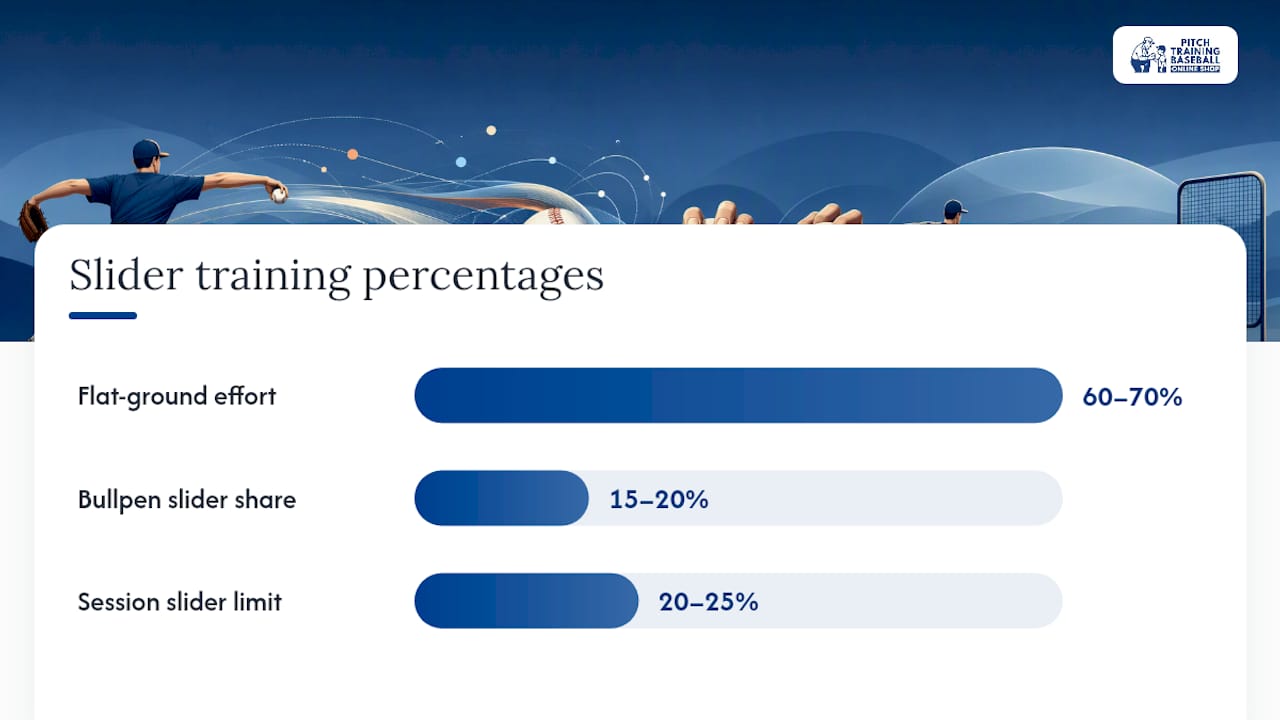
- Flat-ground reps: 10–15 reps per session at 60–70% effort from flat ground, tracking spin visually or with a sensor.
- Bullpen with a target: introduce a strike-zone target net to add location feedback. Keep slider volume to 15–20% of total bullpen pitches.
- Game-condition reps: add sliders to live bullpens or controlled scrimmages with pitch-count monitoring.
Safety guidelines:
- Stop immediately if the pitcher reports elbow pain, not soreness, on the medial side
- Limit slider volume to 20–25% of total pitches in any session
- Follow recommended daily pitching habits for rest and arm care between sessions
- Never throw sliders when fatigued; mechanics break down and injury risk spikes
Pitchtrainingbaseball’s slider coaching material frames this as a teachable progression where grip, release, and measurement each get dedicated practice time before combining them under game pressure.
Pro Tip: Use soft training balls for the grip-only and flat-ground phases. They reduce the physical load on the arm while still giving accurate spin feedback, which makes them ideal for young pitchers building the feel for a new pitch.
An honest take on slider development timelines
The slider is the pitch coaches most often rush and players most often misunderstand. Most young pitchers expect to throw a sharp, late-breaking slider within a few weeks of learning the grip. That is not how arm development works.
Consistent, measurable slider movement typically takes months of deliberate practice, not sessions. The grip needs to become automatic before the release can be refined. The release needs to be stable before spin-axis data means anything. And spin-axis data needs to be consistent before you can start adjusting for specific hitter tendencies.
What actually separates pitchers who develop a reliable slider from those who plateau is measurement combined with patience. Throwing 20 sliders a session with a Rapsodo unit and reviewing the axis data afterward is more productive than throwing 60 sliders with no feedback. The baseball slider mechanics and safety resource from Pitchtrainingbaseball makes this point clearly: the pitch is a skill, not a trick, and it rewards the same deliberate repetition that builds any other athletic movement.
Safety is not a footnote here, and incorporating ballistic training can support the strength and power development that underpins effective pitching mechanics. The elbow stress from slider mechanics is real, and the coaches who treat age and workload guidelines as suggestions rather than rules are the ones whose pitchers end up in physical therapy. Teach it right, measure it consistently, and the slider becomes one of the most effective pitches in a young arm’s arsenal.
Build slider control with the right training tools
Developing reliable slider movement requires more than bullpen reps. You need feedback on location and the ability to practice safely at reduced intensity.

Pitchtrainingbaseball’s Pitching Target Net with 9-Zone Strike Zone gives pitchers immediate visual feedback on where each slider lands, which is exactly what the bullpen phase of the progression above requires. Pair it with soft pitch training balls for the grip-only and flat-ground phases, and you have a complete setup for safe, measurable slider development at home, in the backyard, or on the field. Both products are designed with youth pitchers in mind, portable enough for any practice space, and built to hold up through the kind of repetition that actually builds a pitch. Head to Pitchtrainingbaseball.com to see the full training lineup and get your pitcher started on a safer, smarter slider progression.
Sources
The sources below back the claims in this article and are worth bookmarking if you want to go deeper on any specific aspect of slider mechanics.
- Slider (SL) | Glossary — MLB
- The Science of the Slider: Breaking Down MLB’s Toughest Pitches — Bat Flips and Nerds
- How to Throw a Slider — BattingLeadoff
Recommended
- Slider Movement: What Players and Coaches Must Know – Pitch Training Baseball
- Mastering proper pitching grip: boost youth baseball skills – Pitch Training Baseball
- Pitching Stance Adjustments: Examples for Youth Coaches – Pitch Training Baseball
- What Is Pitching Arm Slot? A Guide for Players – Pitch Training Baseball