


Balance through the stride and a finish that carries low across the body: those two cues fix more youth pitching problems than any other adjustment you can make in a single practice. They matter because they control hip-to-shoulder separation, the torque-generating gap between when the hips open and the shoulders follow. Get that separation right and the arm decelerates safely instead of getting yanked to a stop. Skip it, and you’re looking at wild pitches and sore shoulders by mid-season.
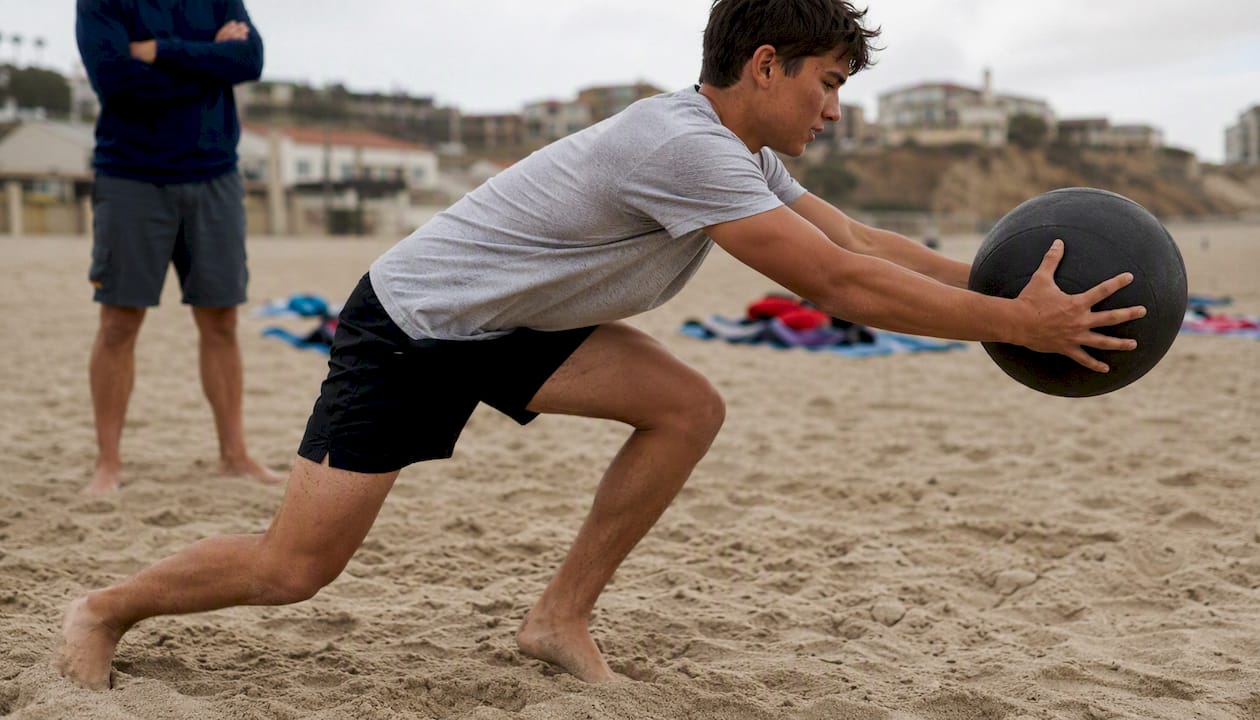
Two drills put those cues to work today. First, the towel drill: hand your pitcher a hand towel instead of a ball, have them go through a full wind-up and throw motion, and listen for the snap indicating good arm speed and sequencing. Second, the two-handed medicine-ball shove: standing in throwing position, have the player push a light medicine ball toward a partner or fence using their legs and trunk, not just their arms. It exposes arm-dominant deliveries almost instantly.
Pro Tip: Pick one cue per session, not five. A kid who hears “balance, hips, elbow, wrist, finish” in the same breath will forget all five. A kid who hears “finish low” ten times will actually do it.
Key Takeaways
Balance through the stride and a low, across-the-body finish drive nearly every mechanical fix a youth pitcher needs, and both are trainable with one cue at a time.
| Point | Details |
|---|---|
| Lead with two cues | Balance/stride and a low, across-body finish fix the most common mechanical faults in youth pitchers. |
| Use the KISS method | Teach one or two cues per session instead of a full mechanical overhaul to improve retention. |
| Progress drills safely | Move from towel drills and medicine-ball shoves to flat-ground throws before adding long toss or mound work. |
| Match drills to age and size | Younger or smaller players need lighter medicine balls and shorter strides before scaling up volume. |
| Practice with the right tools | Pitchtrainingbaseball.com’s target nets and training balls support the accuracy and sequencing drills covered above. |
Table of Contents
- What Throwing a Ball Physics Teaches You About Youth Mechanics
- What Drill Progression Trains These Mechanics Safely?
- How Do You Run a Focused 15-Minute Coaching Session?
- Which Mistakes Show Up Most and How Do You Fix Them?
- Where PitchTrainingBaseball.com’s Coaching Resources Fit In
- How Do Force, Torque, and Motion Actually Drive a Pitch?
- How Do You Measure and Improve Velocity and Accuracy?
- How Should Mechanics Change by Age, Size, and Skill Level?
- What Do Coaches Get Wrong About the Physics of a Pitch?
- Why KISS Coaching Beats Mechanical Overhauls
- Building Your Practice Kit for These Drills
- Key External and Internal Resources
- Frequently Asked Questions
- Sources
What Throwing a Ball Physics Teaches You About Youth Mechanics
Coaches don’t need a physics degree to use physics. What matters is knowing which checkpoints, watched from the mound or the sideline, tell you whether a young arm is moving efficiently or fighting itself. Here’s the mechanical sequence worth drilling into every session.
- Lower half first. The push off the rubber initiates everything. A stride that’s too short robs the throw of ground force; most pitching instruction points toward a stride length that grows toward roughly 80% of the player’s height as they mature, though younger or smaller kids should build up to that gradually rather than reach for it on day one. The plant leg needs to stay firm, not buckle, at landing.
- Hip-to-shoulder separation. This is the single biggest lever for safe velocity. The hips start rotating toward the plate while the shoulders and throwing arm stay closed a beat longer. That delay is what creates torque without forcing the arm to do extra work. If rushed, the arm has to catch up on its own, increasing the risk of overuse injuries.
- Arm path. Watch for the inverted W, where both elbows rise above the shoulders during the load phase. It looks aggressive but it’s a red flag. The elbow should sit at or just below the shoulder line as the arm comes through.
- Release and grip. A basic four-seam grip, fingers across the seams with a small gap between the ball and the palm, gives the most consistent spin for a beginner. Consistency at release matters more than velocity at this age.
- Finish and follow-through. Coaches should reinforce finishing low and across the body with the chest ending over the front knee. Little League’s coaching guidance points to this exact finish as the fix for high pitches and a short, abrupt arm stop.
Quick checkpoint: “Nose over belt buckle” at release. If the head is drifting off-line, balance and accuracy usually go with it.
What Drill Progression Trains These Mechanics Safely?
Mechanics stick when drills isolate one piece of the chain at a time, without adding the stress of a full mound throw before the body is ready. Here’s the order that works.
- No-ball drills first. The towel drill teaches arm whip and sequencing with zero impact on the arm, since there’s no ball to decelerate. Pair it with the rocker throw: player rocks weight back onto the rear leg, then rocks forward into a short throw, which grooves the weight transfer that a lot of young pitchers skip entirely. Ten to fifteen reps is plenty.
- Plyo-ball and medicine-ball shoves. Coaching resources built for youth programs recommend the two-handed medicine-ball shove specifically because it forces the lower half and trunk to generate the power, exposing an arm-only delivery within a few reps.
- Flat-ground, short-toss. Once the no-ball work looks clean, move to flat-ground throws at short distances, maybe 20 to 30 feet, with full attention on keeping the same mechanics under slightly more intent.
- Long-toss progression. Distance should be earned, not assigned. Progressive throwing guides stress increasing distance only after mechanics at the current distance stay clean, and using intent control rather than max-effort heaves at every step.
- Warm-up and arm care. Band work and wrist flicks before any throwing, plus a genuine rest day between high-volume sessions, protect the gains from the drills above.
Pro Tip: If a kid’s mechanics fall apart the moment you add a ball and a target, back up a step. The towel drill and the medicine-ball shove exist precisely because they remove the pressure of “get it over the plate” so the body can learn the pattern first.
How Do You Run a Focused 15-Minute Coaching Session?
Keep It Short and Simple, or KISS, isn’t a slogan here. It’s the actual method Little League’s own coaching material recommends: pick one or two cues, repeat them across every drill in that session, and resist the urge to fix everything at once.
A workable session checklist looks like this:
- Watch the first two throws for balance and glove-to-hand transfer before saying a word.
- Check arm path on the load: is the elbow riding above the shoulder line?
- Confirm hip rotation timing against shoulder rotation.
- Note head position at release. Drifting means the balance cue needs work.
- Look at the finish. Is the chest ending over the front knee, or stopping short?
Each drill reinforces a specific fix. The towel drill sharpens arm whip and elbow position. The medicine-ball shove locks in lower-half sequencing. Flat-ground work ties the whole chain together under game-like timing.
Pro Tip: Film two angles, front and side, for ten throws. Pick the single biggest issue, give one cue, then have the pitcher throw ten more and compare. That’s a full feedback loop in under five minutes, and it beats a ten-minute lecture every time.
Which Mistakes Show Up Most and How Do You Fix Them?
Most youth pitching flaws trace back to five recurring patterns, and each one responds to a single, repeatable cue rather than a mechanical overhaul.
- Inverted W: Elbows rise above the shoulders during the load. Cue: “Show the ball to the shortstop,” which keeps the arm in a safer slot.
- Early hip rotation: Hips open before the arm is ready, killing the separation that generates safe torque. Cue: “Keep the back hip pointed at the catcher” a beat longer than feels natural.
- Head whack: The head snaps off-line at release, dragging accuracy with it. Cue: “Nose over belt buckle.”
- Short arming: The arm cuts the throwing motion short instead of extending fully. The towel drill, run at slow speed with a focus on extension, corrects this faster than verbal instruction alone.
- Collapsing back knee or a short finish: The pitcher stops rotating and lands stiff instead of driving through. Cue: “Finish low across the body,” and physically mark the landing spot on the mound as a visual target.
One cue, one drill, one rep block. That’s the whole fix for most of these.
Where PitchTrainingBaseball.com’s Coaching Resources Fit In
These cues and drills line up directly with what Pitchtrainingbaseball covers on the kinetic chain and arm health, and with the step-by-step progressions in its guide to defining youth pitching mechanics. Albert, who writes much of the site’s coaching content, built these recommendations around years of watching youth pitchers struggle with the same handful of fixable patterns. A target net, a soft-toss ball, and a medicine ball cover nearly every drill above without needing a full mound setup.
How Do Force, Torque, and Motion Actually Drive a Pitch?
A pitch is really a chain reaction: force from the legs, torque through the trunk, and momentum that has to go somewhere by the time the ball leaves the hand. The legs generate the initial push against the rubber, and that ground force travels up through the hips. Torque, the rotational force created by hip-to-shoulder separation, is what turns that leg drive into arm speed without the arm having to do all the work alone. Think of it like wringing out a towel: the twist in the middle generates far more snap at the ends than either hand moving on its own.
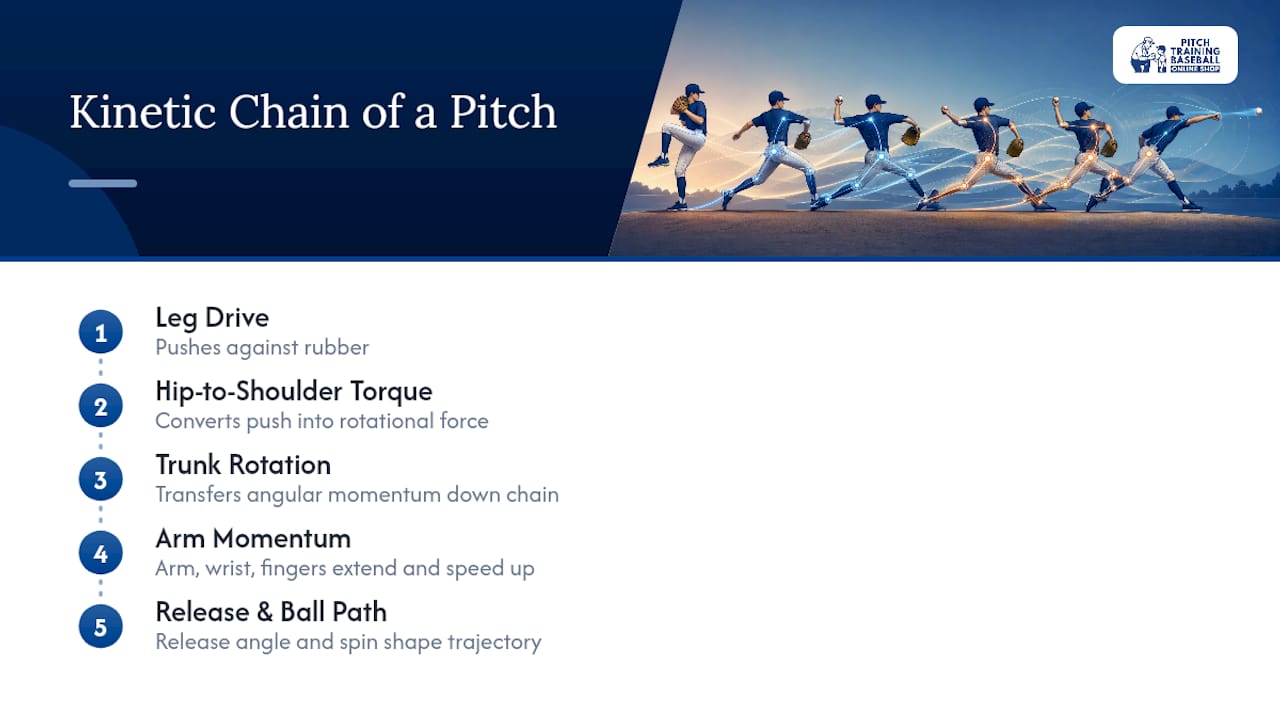
Angular momentum matters here too. As the trunk rotates and the arm extends outward, the body’s rotational speed transfers down the chain, arm, wrist, fingers, right up to release. A pitcher who short-circuits this chain by skipping hip rotation or cutting the finish short is forcing the arm to generate speed it should be borrowing from the rest of the body. That’s not just a mechanical inefficiency. It’s the direct cause of a lot of the shoulder and elbow strain coaches see in young arms.
Once the ball leaves the hand, its path is shaped by the release angle and the ball’s spin, both of which a pitcher controls through grip and arm slot rather than sheer effort. None of this requires a physics lecture at practice. It just explains why “push off the rubber” and “finish low” aren’t arbitrary coaching phrases. They’re the cues that keep the force flowing through the body instead of dumping it all on the arm.
How Do You Measure and Improve Velocity and Accuracy?
Velocity gains in youth pitchers come from sequencing improvements long before they come from added strength or effort. A radar gun tells you the number, but it won’t tell you why the number is low, and chasing velocity directly, without fixing the chain that produces it, is how arms get hurt.
Track two things instead: consistency of release point and stride length relative to height. If a pitcher’s release point wanders from throw to throw, accuracy suffers no matter how hard they try. Video from the side, checked against the checklist in Pitchtrainingbaseball, catches this faster than a stopwatch or radar reading ever will.
For accuracy specifically, target work matters more than volume. A strike-zone target net that divides the zone into quadrants lets a pitcher get immediate visual feedback on where the ball is actually going, rather than guessing based on the catcher’s reaction. Throws to the same quadrant, tracking makes versus misses, tell you more about a pitcher’s command than throws without a target.
Velocity, when it’s safe to chase, improves through the progressive long-toss work covered earlier, paired with the medicine-ball drills that build trunk strength. Both approaches earn gains gradually instead of forcing them.
How Should Mechanics Change by Age, Size, and Skill Level?
A 9-year-old and a 13-year-old shouldn’t be running the identical drill progression at the identical volume, even if the underlying mechanics stay the same. Younger, smaller players typically have less core strength to generate torque safely, so the cues need to prioritize balance and sequencing over stride length or velocity.
For the youngest pitchers, stick almost entirely to no-ball drills, the towel drill and rocker throw, for several weeks before introducing a ball at short distance. Their stride length should be modest and built up gradually rather than pushed toward that 80%-of-height benchmark early. Medicine-ball work should use a lighter ball, sometimes as light as two pounds, so the drill teaches sequencing without straining an undeveloped core.
Bigger, stronger players in the 12 to 14 range can handle more volume in the long-toss progression and slightly heavier medicine balls, but the mechanical checkpoints don’t change. Hip-to-shoulder separation, arm path, and finish still get evaluated the same way. What changes is pace: a taller, more physically mature player might be ready for mound work and longer toss distances sooner than a smaller teammate the same age.
The mistake most coaches make is treating age as the only variable. Skill level and physical maturity matter just as much. A smaller 13-year-old with clean mechanics should progress faster than a bigger 11-year-old still fighting an inverted W.
What Do Coaches Get Wrong About the Physics of a Pitch?
The biggest misconception is that harder throwing comes from arm effort. Parents and coaches see a stiff, max-effort arm swing and assume that’s what generates velocity, when it’s usually the opposite: an arm working overtime because the lower half and trunk aren’t doing their share.
A second misconception is that longer strides always mean more power. Stride length matters, but only when it’s paired with a stable plant leg and proper hip timing. A long stride with a collapsing front leg wastes the ground force it should be capturing, and can actually slow the kinetic chain down.
A third misunderstanding: that follow-through is just cosmetic, something that happens after the important part is over. It isn’t. The finish is how the arm sheds the force it just generated. Cut it short, and that energy has nowhere to go but into the shoulder and elbow.
The fix for all three is the same KISS principle running through this whole guide: a single, clear cue, “drive with the legs,” “plant and stay tall,” “finish low,” corrects the underlying physics without ever mentioning the word torque to an 11-year-old. Kids don’t need to understand the mechanism. They need a phrase they can act on immediately.
Why KISS Coaching Beats Mechanical Overhauls
The conventional advice on youth pitching mechanics tends to pile on. Watch enough travel-ball parents on the sideline and you’ll hear five corrections shouted between innings, all well-intentioned, all canceling each other out. The research behind the KISS approach exists because it works, not because it’s easier for coaches. A kid’s brain can hold one new instruction under game pressure. Maybe two.
What’s underrated here is how much of “throwing a ball physics” comes down to sequencing, not strength. Coaches chase velocity by pushing kids toward longer strides and harder effort, when the actual lever, hip-to-shoulder separation, is a timing issue, not a strength issue. Fix the timing with a cue like “keep the back hip closed” and velocity often follows on its own, safely.
If there’s one thing I’d tell every coach reading this: stop trying to fix everything you see in a single bullpen. Pick the cue that matters most for that player, that day, and let the drill progression, towel drill, medicine ball, flat-ground, long toss, do the rest of the work over weeks, not minutes.
Building Your Practice Kit for These Drills
Running the medicine-ball shove and the target-based accuracy drills is a lot easier with the right gear already at practice instead of improvising with whatever’s in the equipment bag. Pitchtrainingbaseball.com built its lineup around exactly the drills covered here, not as add-ons but as the actual tools this progression depends on.

The Pitching Target Net with a colorful 9-zone strike layout turns the accuracy work from the section above into something a kid can see and self-correct against, rather than guessing where the ball landed. For coaches running multiple stations, a set of training balls built for repeated command drills keeps volume manageable without wearing out a single ball. Try the drills first with whatever you’ve got on hand. If the target work and the medicine-ball shove start showing results, that’s when it makes sense to build them into a permanent part of your practice setup.
Key External and Internal Resources
- Little League: coaching young pitchers with a keep-it-simple approach
- Baseball PEI coaches’ pitching resource guide
- Baseball throwing drills and arm strength guide
- Fixing common youth pitching mistakes
- How to throw a baseball: youth coaching tips
Frequently Asked Questions
What’s the single most important cue for a youth pitcher’s mechanics? Balance through the stride paired with a low, across-body finish. Those two cues govern hip-to-shoulder separation and safe deceleration, which affects nearly every downstream mechanical issue.
How many cues should a coach give during one bullpen session? One, maybe two. Little League’s own coaching guidance recommends the KISS approach specifically because young players can’t process a full mechanical overhaul mid-throw.
What drill fixes an inverted W arm path? The towel drill, combined with the cue “show the ball to the shortstop,” keeps the elbow at a safer height during the load phase without requiring a full arm-slot rebuild.
How does stride length affect a youth pitcher’s throw? A longer stride captures more ground force, but only when paired with a stable plant leg.
Is more throwing volume the fastest way to build arm strength? No. A progressive plan with band work, wrist flicks, and earned long-toss distance protects mechanics far better than raw volume, and it reduces the injury risk that comes with rushing distance.
Sources
- Coaching Young Pitchers in Baseball – Keep It Simple - Little League
- Baseball PEI Coaches Resource_Fixes_2026.Final.pdf
- Baseball throwing drills: mechanics, accuracy & arm strength guide
Recommended
- Defining Youth Pitching Mechanics: A Coach’s Guide – Pitch Training Baseball
- How to throw a baseball: proven youth coaching tips – Pitch Training Baseball
- How to improve baseball throwing: techniques and tools – Pitch Training Baseball
- Why Proper Pitching Technique Matters for Young Players – Pitch Training Baseball